Script Installation
The installation is technical and requires some knowledge of web development and server management. If you are not comfortable with these tasks, we recommend using purchasing the installation service, otherwise proceed with the installation by following these steps:
- Verify that your server meets the server requirements.
- Download the package from CodeCanyon.
- Unzip the package and transfer the files to your server via FTP or any other method you prefer.
- Download the db.sql SQL file from https://influeencer.com/sync/. A valid license is required to access this file. Create a MySQL database on your server and import the db.sql SQL file to set up the necessary tables.
- Rename config_.php to config.php.
-
Edit config.php and fill the required constants:
-
IEE_URL
The URL of your Influeencer installation, e.g., https://yourdomain.com/. It must end with a slash. -
IEE_DOMAIN
The domain of your Influeencer installation, e.g., yourdomain.com. -
IEE_ADMIN_EMAIL
The email address of the administrator, if will be used to send notifications and more. -
IEE_DB_NAME, IEE_DB_USER, IEE_DB_PASSWORD, IEE_DB_HOST, IEE_DB_PORT
The database name, user, password, host, and port for your MySQL database. -
IEE_SMTP
The SMTP server details for sending emails. It must be an array like this: ["HOST", "USER", "PASSWORD", "PORT", "SENDER EMAIL", "SENDER NAME"]. When an Influeencer user sends a message to an influencer, it is delivered directly to the influencer’s email address. The sender name will match the Influeencer account name, and the email address will follow the format: [account-name]@your-email-domain.com. We recommend using AWS SES for sending emails, as it is more reliable and scalable. -
IEE_EMAIL_TEMPLATE
The email template to use for sending emails. It should be an HTML code. You can use the following merge fields: {subject}, {title}, {message}, {link}, {link_text}. They will be replaced with the actual values when sending emails. You can download our default template here. -
IEE_EMAIL_FOOTER
The footer of the email template. It should be an HTML code. You can use the following merge fields: {unsubscribe_link}. You can download our default template here. -
IEE_CRON_PASSWORD
The password to use for the cron job. It must be a strong password. -
IEE_LICENSE_KEY
Your Envato Purchase Code.
-
Server Configuration
Once you have uploaded the files and configured the database, the next step is to set up your server. Ensure your server meets the server requirements and is configured as described below. We recommend using a VPS or dedicated server with Plesk as the control panel.
Timezone
Configure both the server and MySQL to use the UTC +00:00 timezone.
- On Linux, edit /etc/mysql/my.cnf or /etc/my.cnf. On Windows, edit the my.ini file.
- Under the [mysqld] section, add default-time-zone = '+00:00'.
- Restart the MySQL server and verify the timezone using the query SELECT NOW().
- Edit your php.ini file or adjust the PHP settings to set date.timezone = "UTC".
- Restart Apache to apply the changes.
PHP-FPM pm.max_children
Set the pm.max_children setting in PHP-FPM to 100.
- On Plesk, go to Plesk > Domain > PHP settings > PHP-FPM settings > pm.max_children, set it to 100.
Additional nginx directives
Add the following directives to your nginx configuration to ensure proper handling of requests and timeouts: proxy_read_timeout 300; proxy_connect_timeout 300; proxy_send_timeout 300; proxy_buffering off;
Cron jobs
Add a cron job that run this URL every 24 hours: https://your-domain.com/ajax.php?cron=CRON-PASSWORD&daily. Add another cron job that run this URL every 60 minutes: https://your-domain.com/ajax.php?cron=CRON-PASSWORD. Replace your-domain.com with your actual domain and CRON-PASSWORD with the password you set in the IEE_CRON_PASSWORD constant in the config.php file.
Server Requirements
- PHP version 8.1 or higher.
- MySQL version 5.7 or higher.
- Apache or Nginx web server.
- PHP extensions: Mailparse, OpenSSL, cURL, mbstring, json, fileinfo, xml, brotli and zip.
Email Piping Setup
To enable Influeencer to receive emails from influencers, you need to configure email piping. This can be done in two ways: using AWS SES (recommended) or through a traditional IMAP or POP3 email server.
Via AWS SES
This is the recommended method for setting up email piping, as it is scalable, more reliable, and capable of handling large volumes of emails.
- Log in to AWS as the root user from aws.amazon.com.
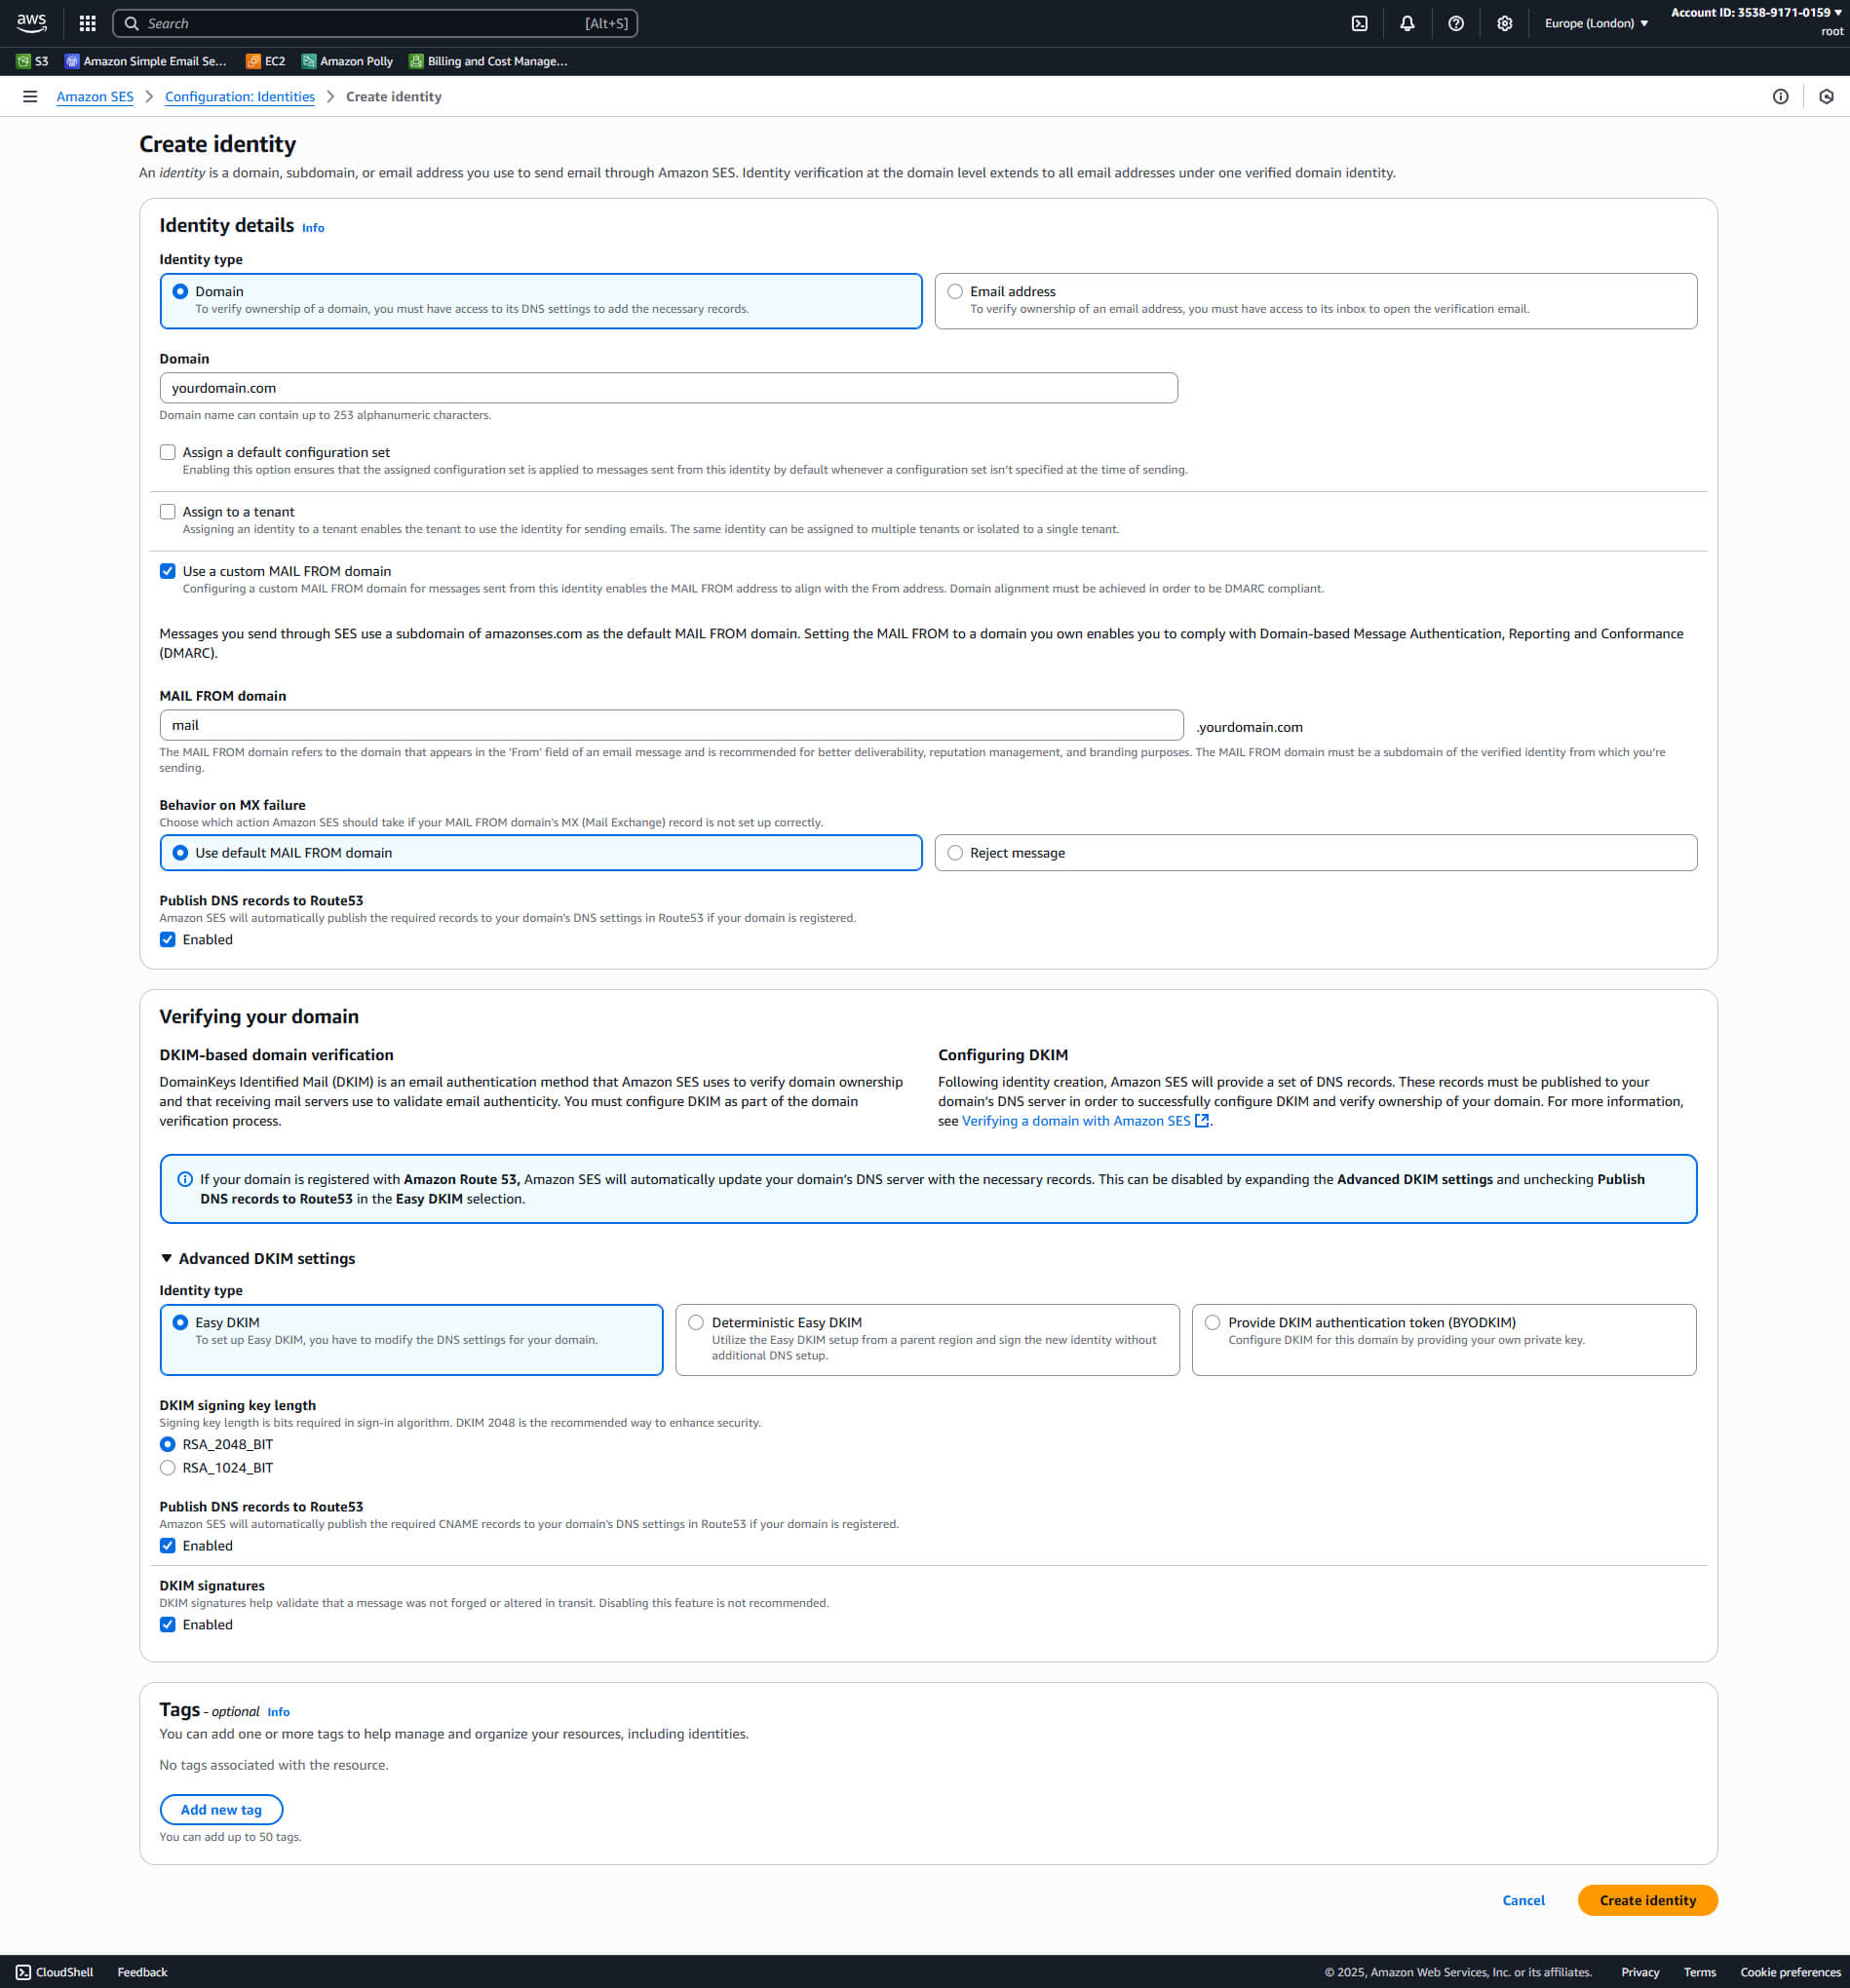
- Go to Amazon SES > Configuration > Identities and click Create identity.
- As Identity type choose Domain and enter the domain you want to use for receiving emails.
- Check Use a custom MAIL FROM domain and enter a subdomain, e.g., mail.yourdomain.com.
- Under Advanced DKIM settings select Easy DKIM and RSA_2048_BIT, then enable Publish DNS records to Route53 and DKIM signatures.
-
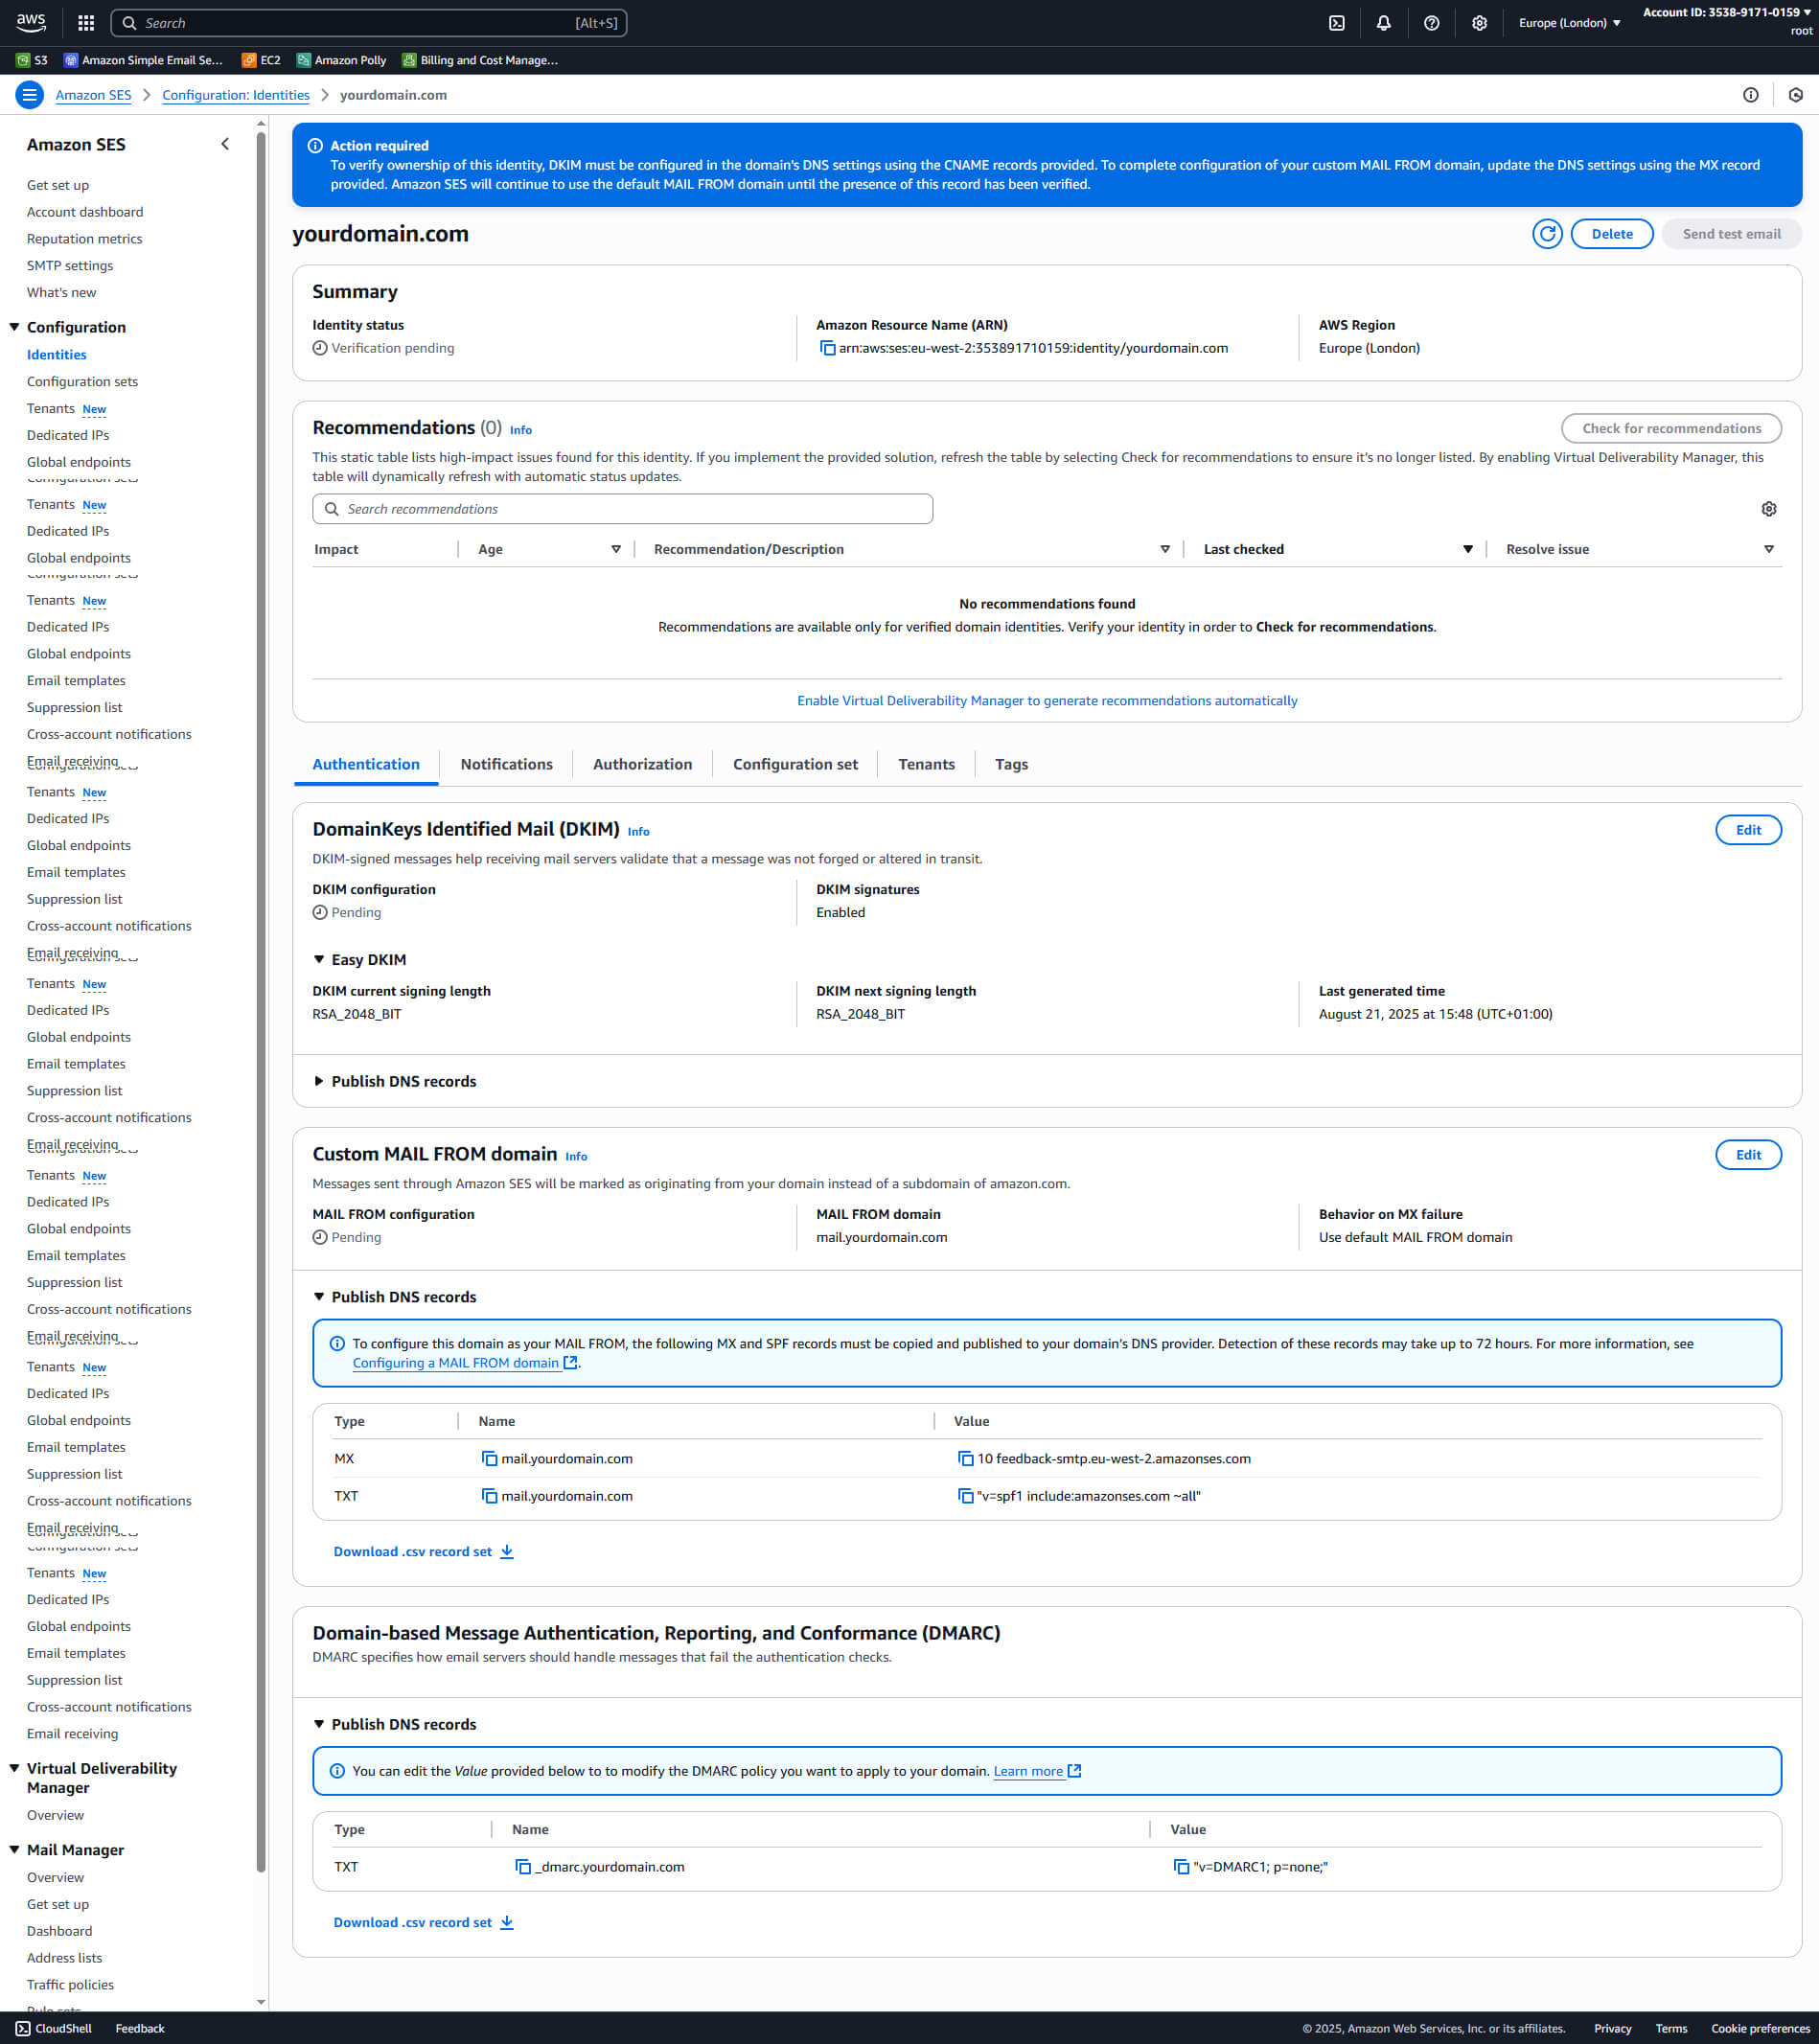
Go to your domain registrar and create the DNS records provided by AWS SES.
You need to create records similar to these:
MX mail.yourdomain.com 10 feedback-smtp.eu-west-2.amazonses.com
TXT mail.yourdomain.com "v=spf1 include:amazonses.com ~all"
TXT _dmarc.yourdomain.com "v=DMARC1; p=none;"
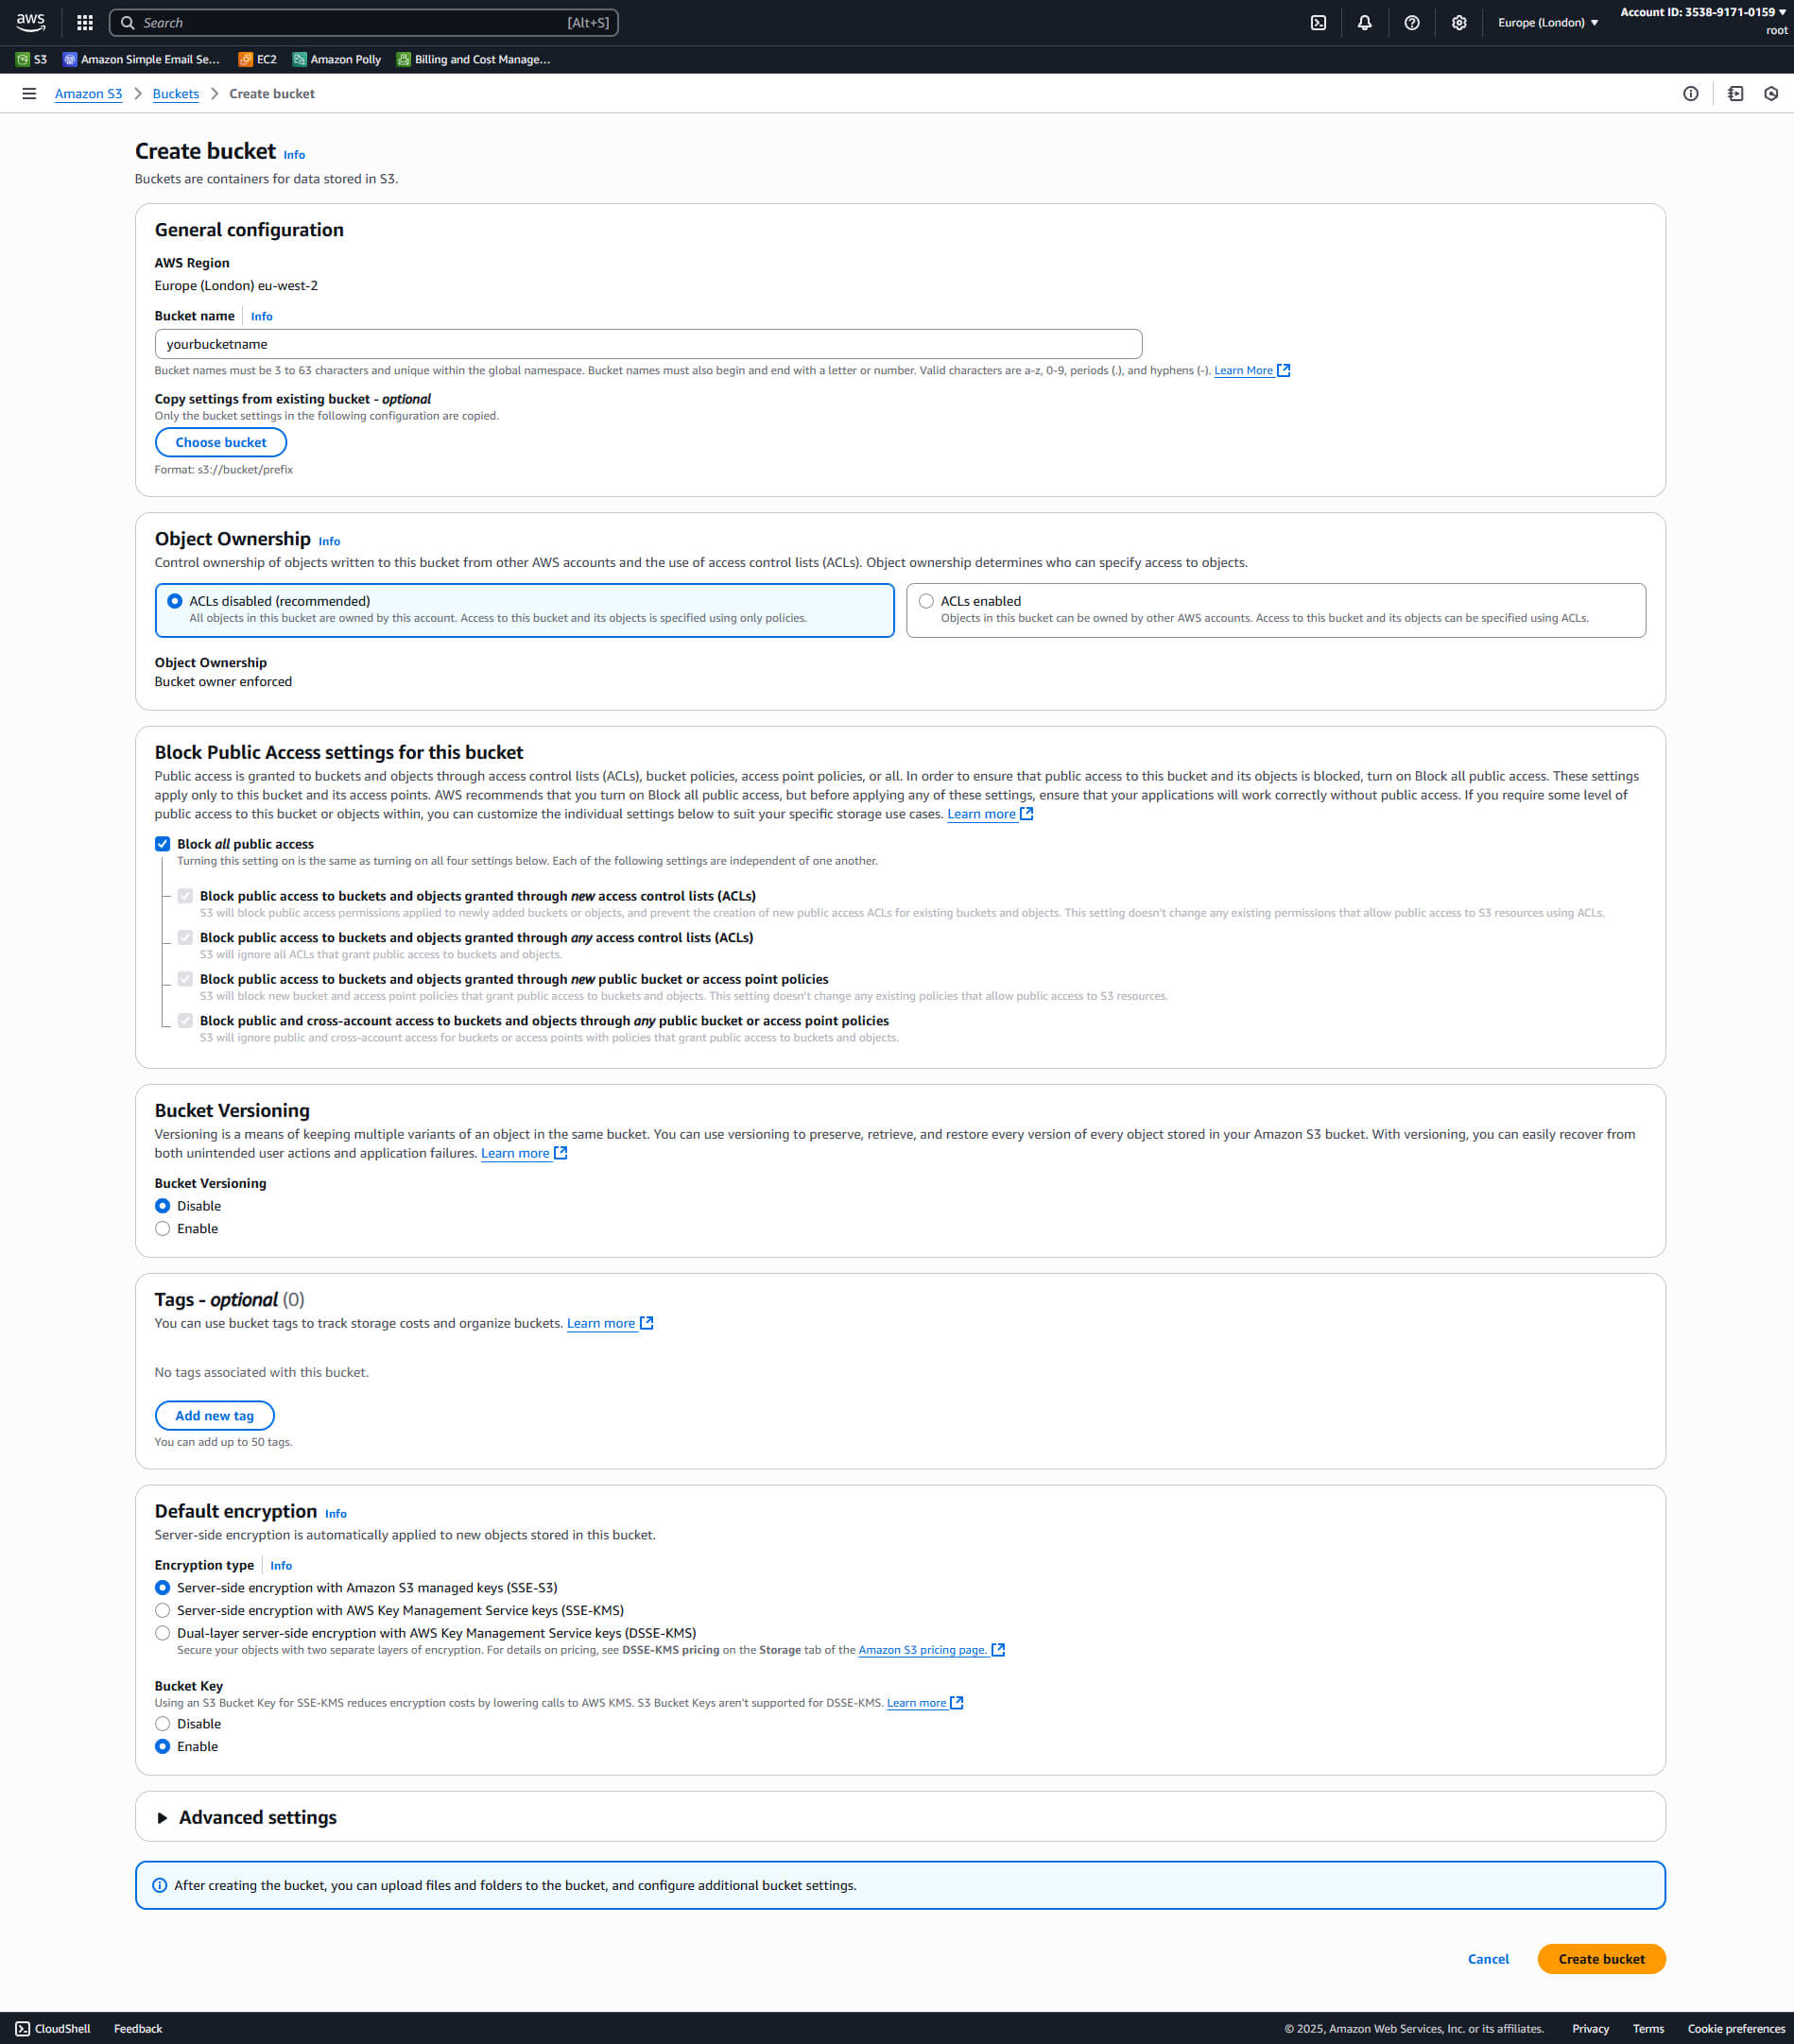
- Go to Amazon S3 and click Create bucket.
- Enter a name, choose ACLs disabled and Block all public access. Leave the other options as default.
-
Open the bucket you just created and go to the Permissions tab. Under Bucket policy click Edit.
Enter the following policy, replacing your-bucket-name with the name of your bucket:
{ "Version": "2012-10-17", "Statement": [ { "Sid": "AllowSESPuts", "Effect": "Allow", "Principal": { "Service": "ses.amazonaws.com" }, "Action": "s3:PutObject", "Resource": "arn:aws:s3:::your-bucket-name/*", "Condition": { "StringEquals": { "aws:Referer": "834797604242" } } } ] } - Go to Amazon SES > Configuration > Email receiving and click Create rule set. Enter a name and click Create rule set.
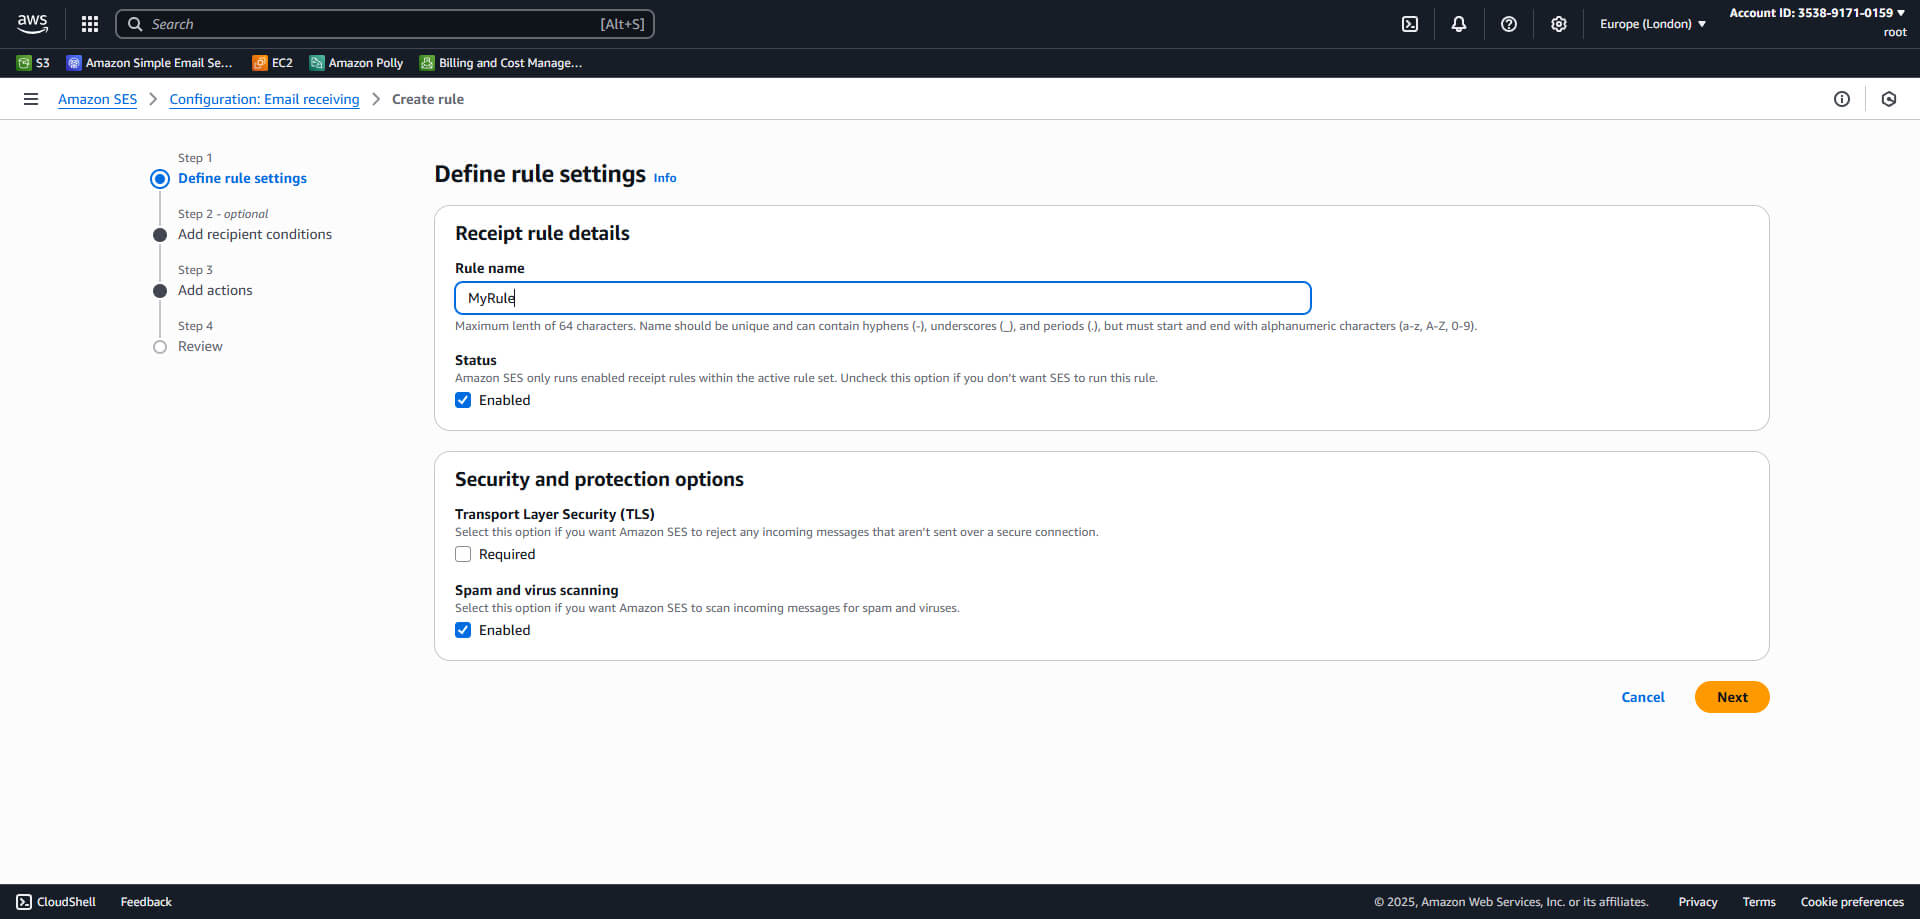
- Click Create rule. Leave Status to Enabled. Enter a name and click Next.
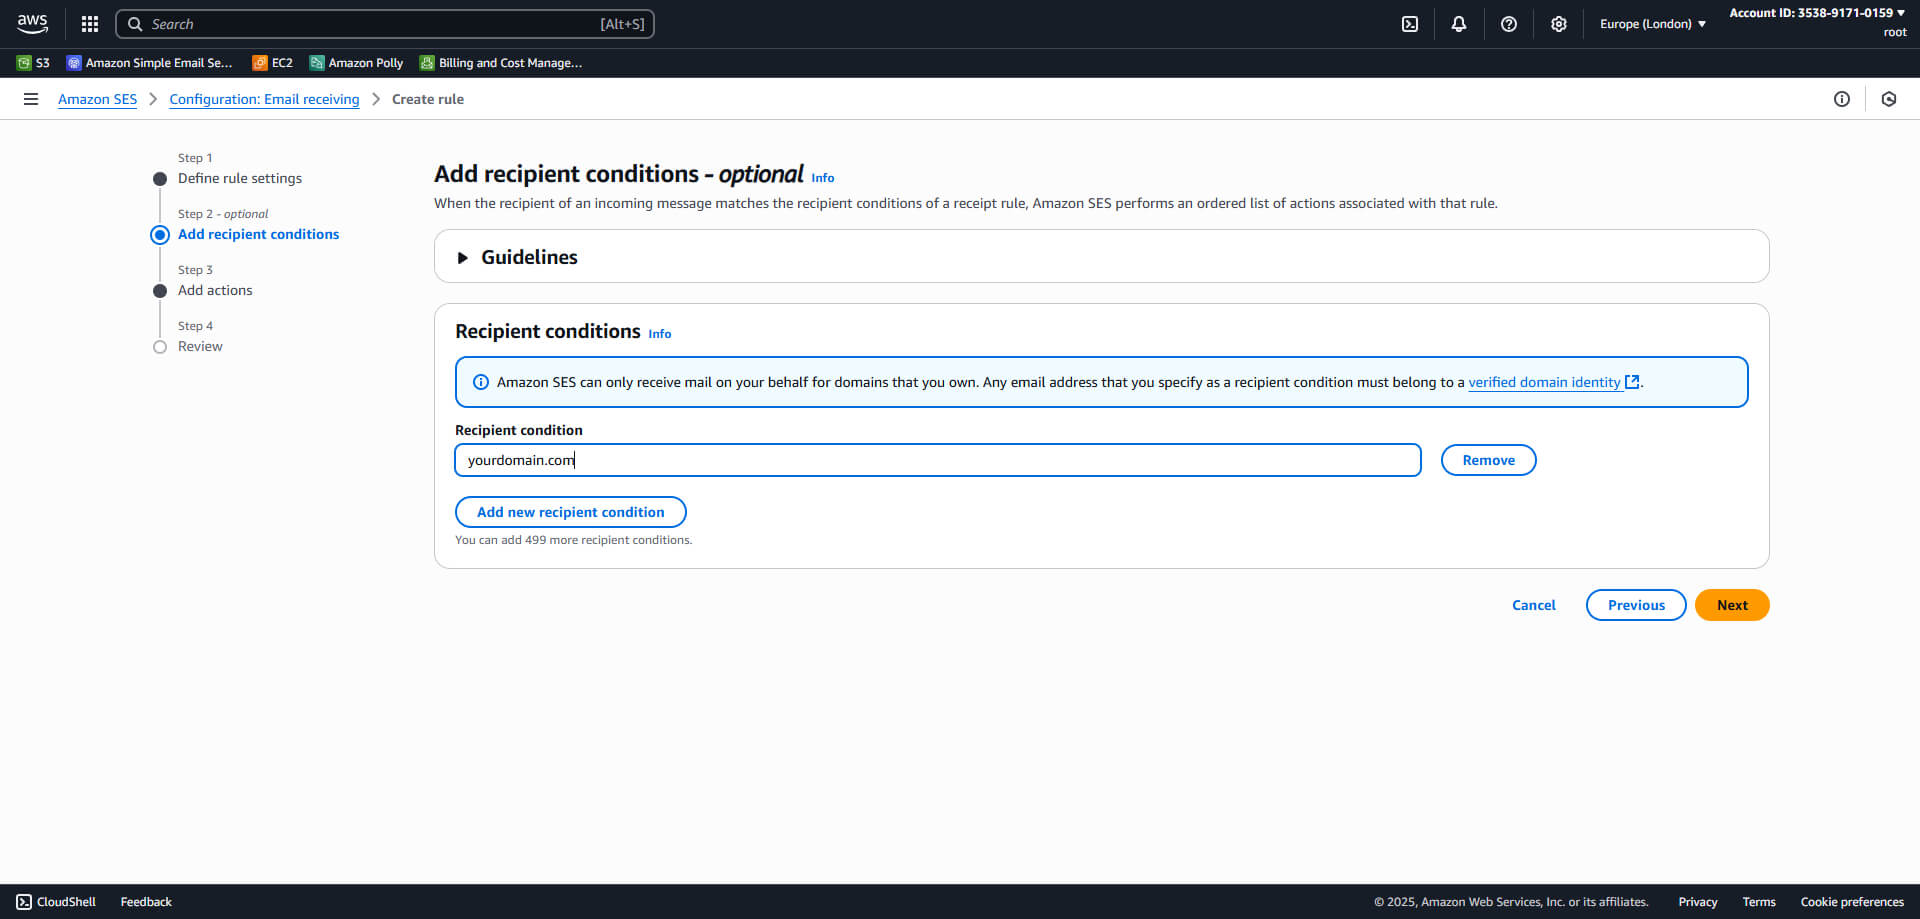
- Add a new Recipient condition and enter your domain name, e.g., yourdomain.com. Click Next .
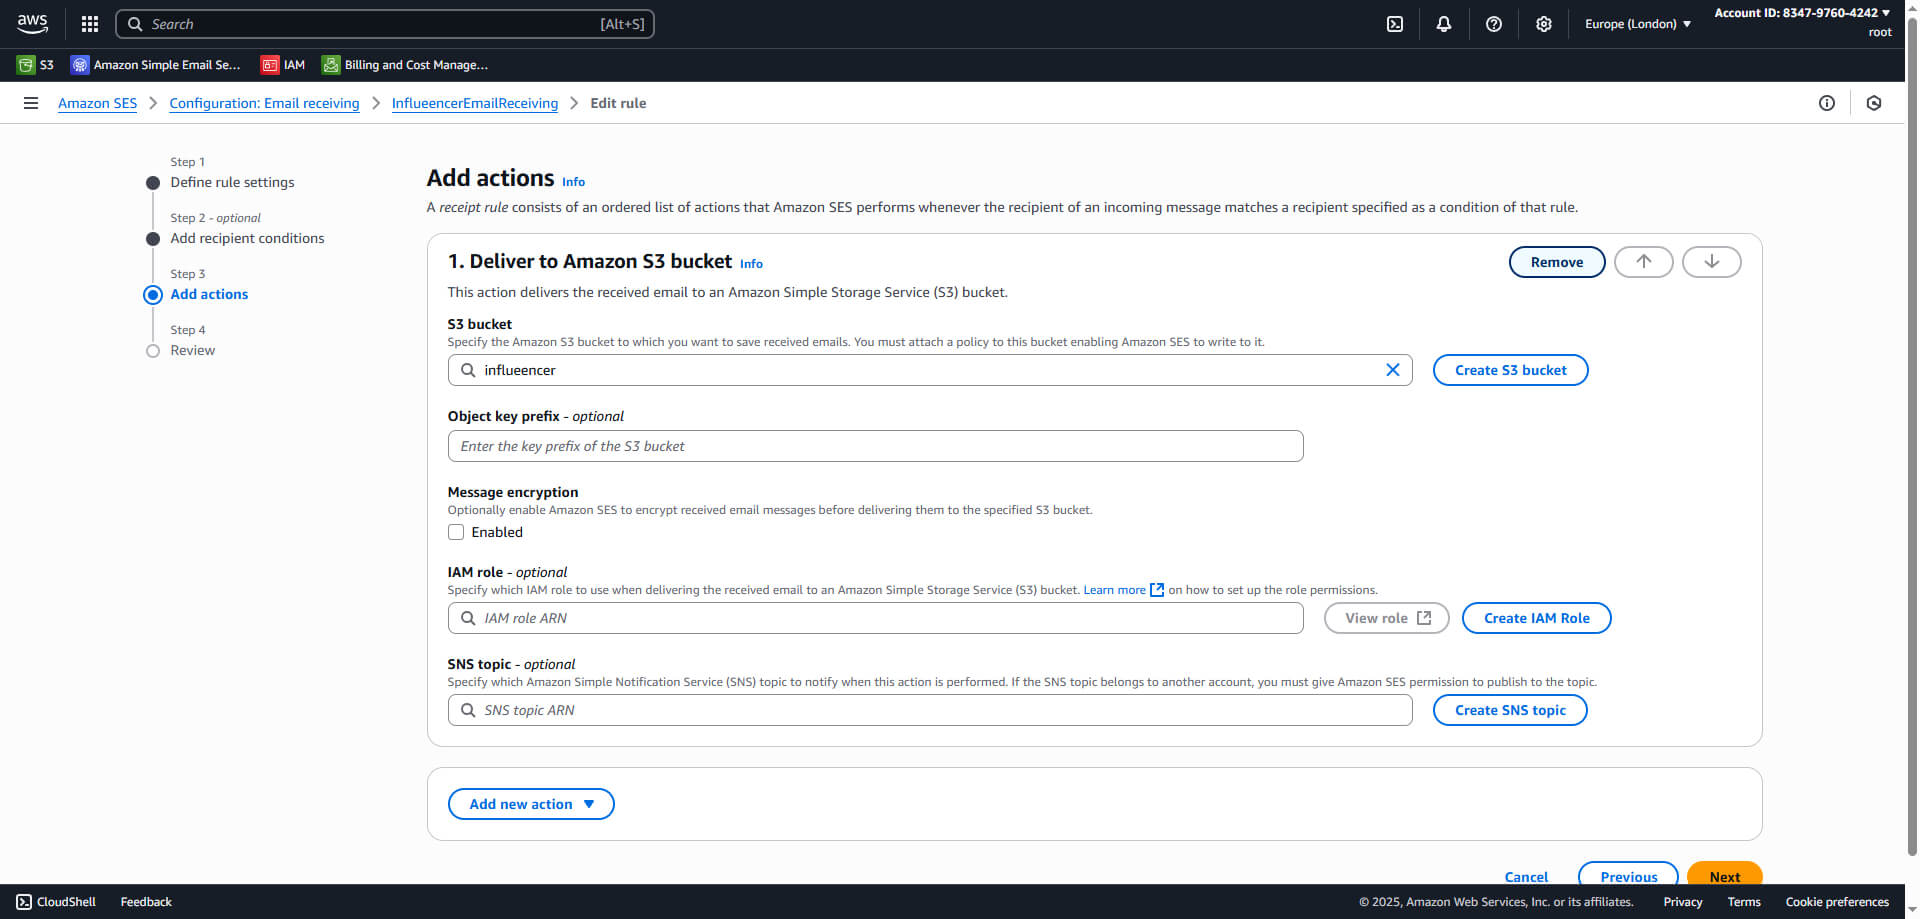
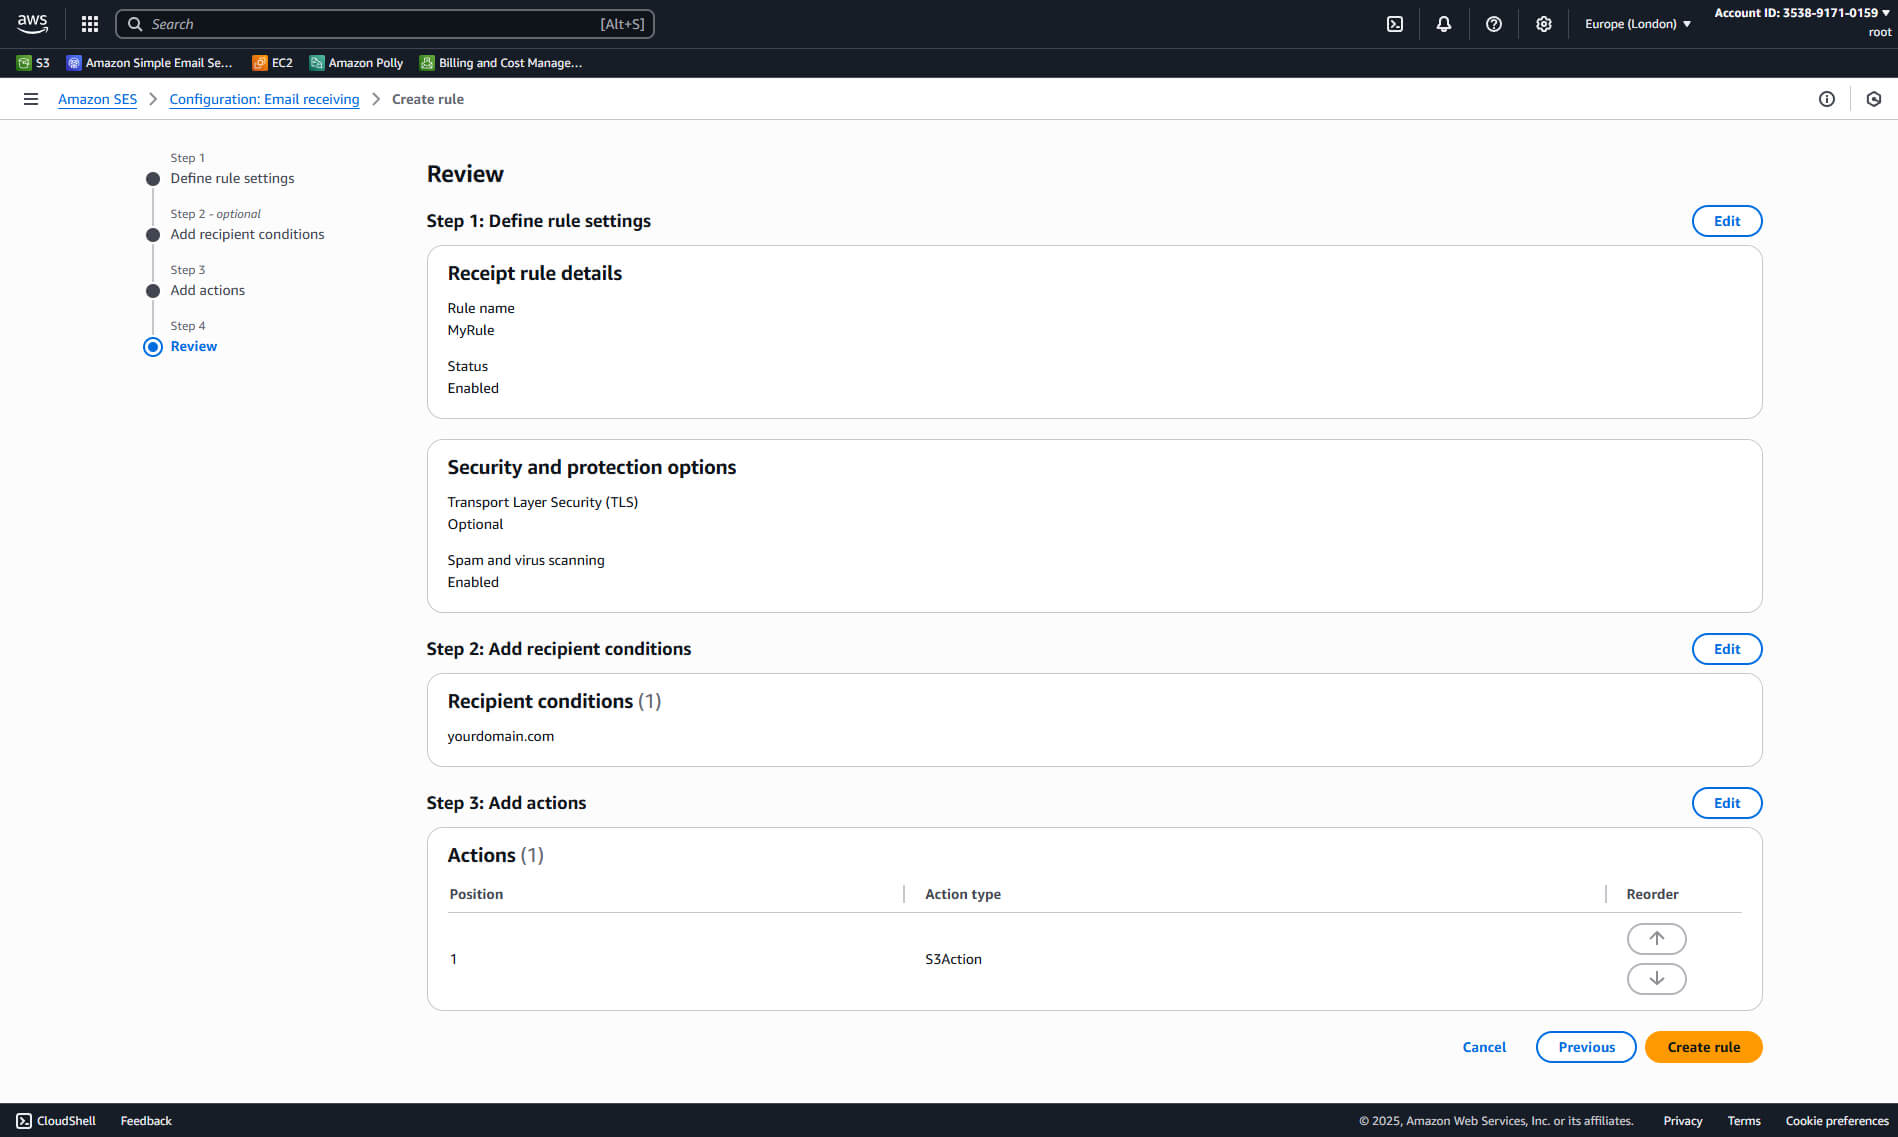
- Click Add new action and select Deliver to S3 bucket. Select the S3 bucket you created previously and click Next, then Create rule.
- Emails sent to your domain will now be stored in the S3 bucket you created. Try sending an email to your domain to test it. The email should appear in the S3 bucket as a new object.
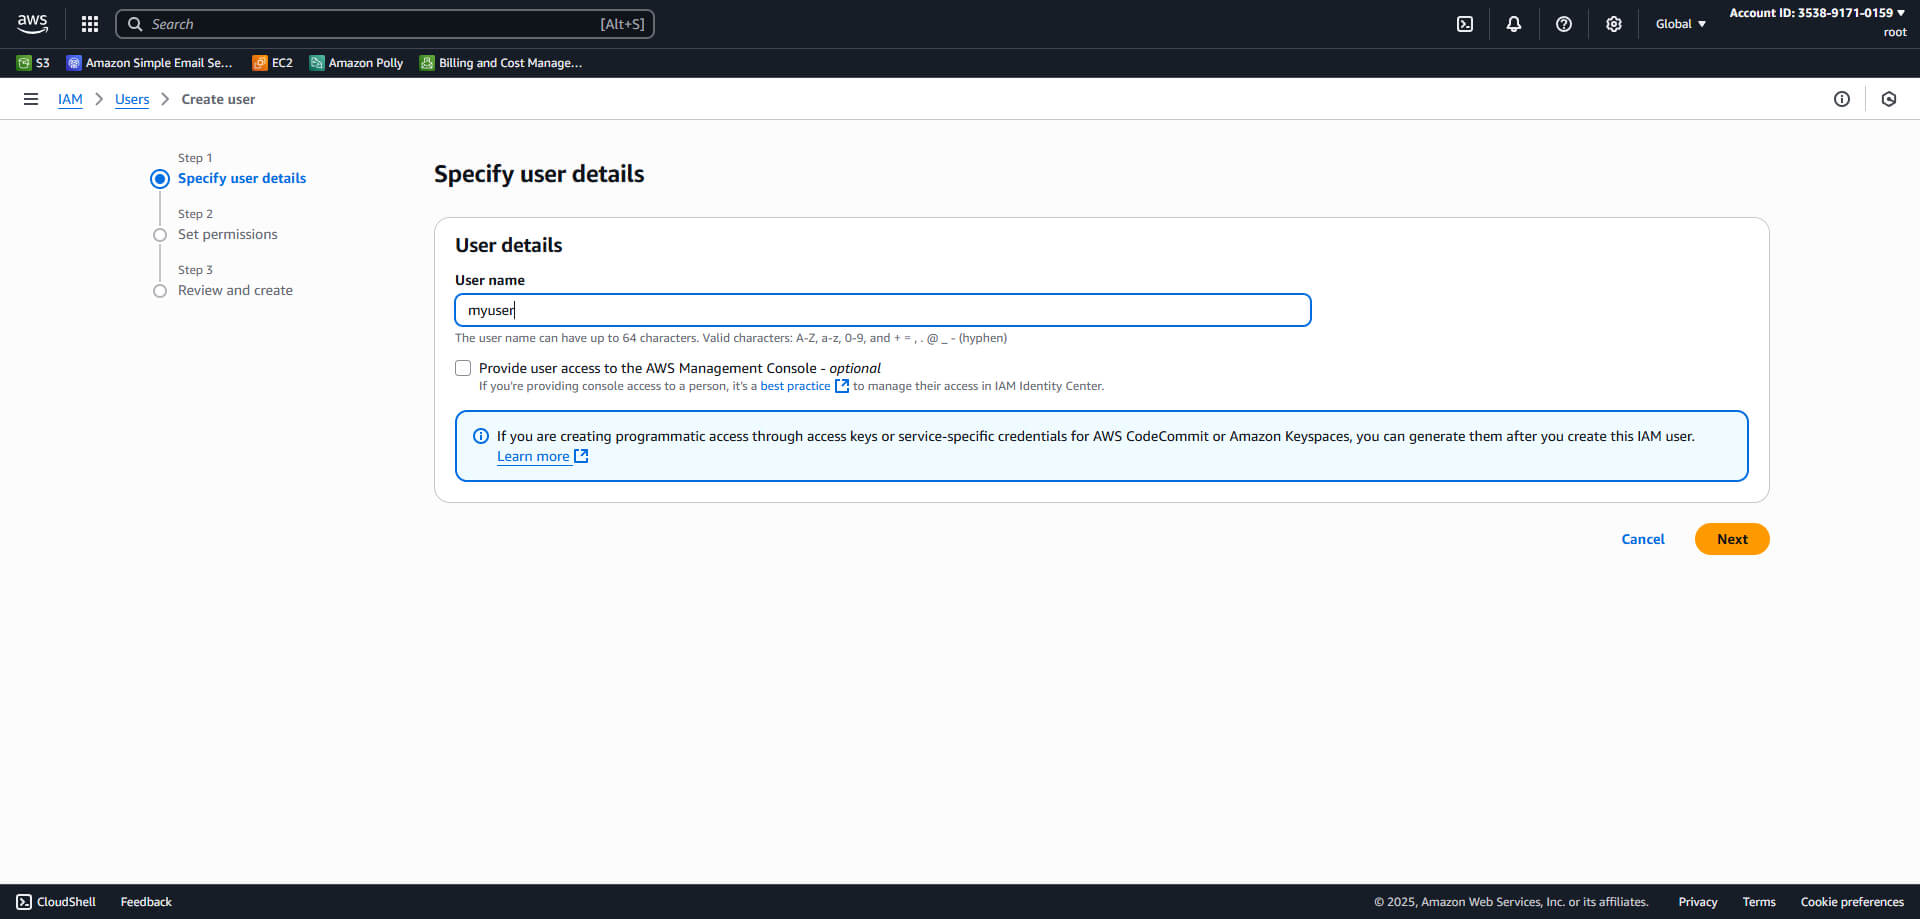
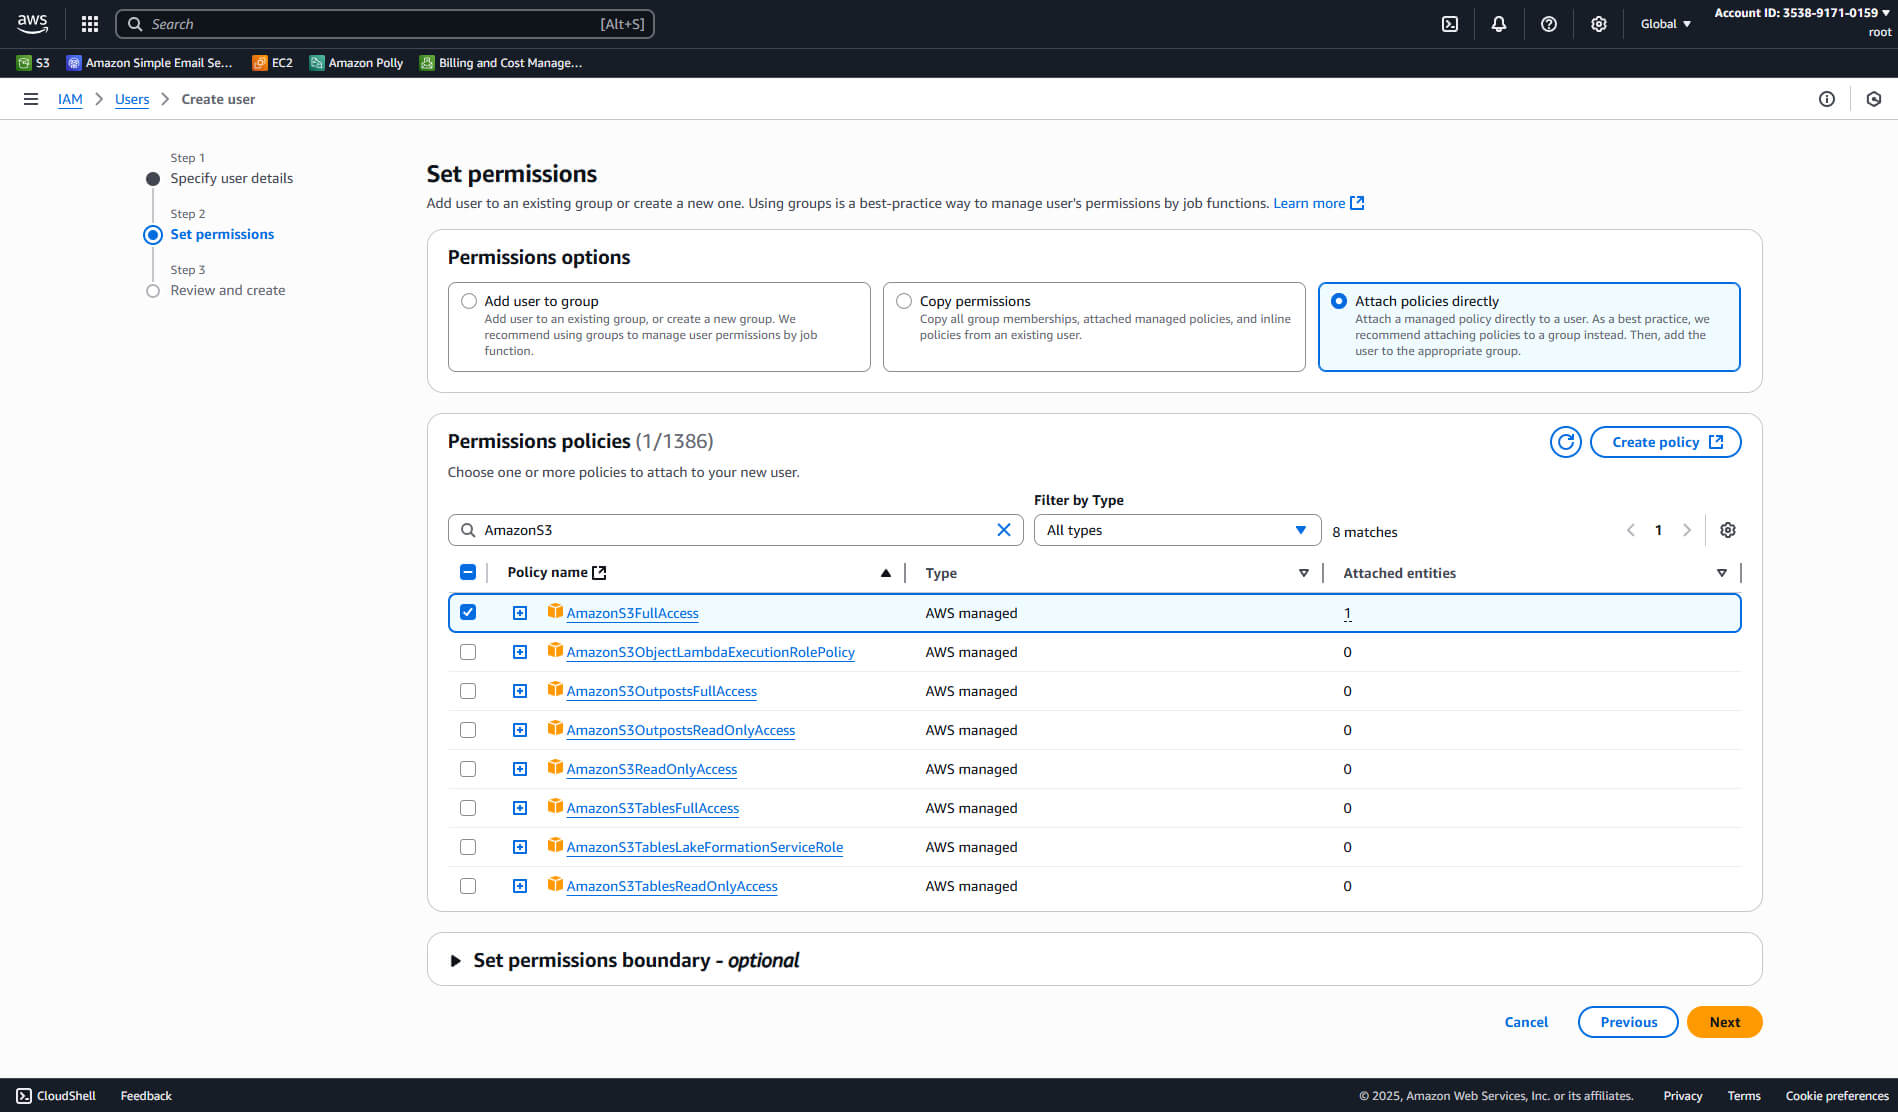
- Go to IAM > Users and click Create user. Enter a name and click Next.
- Select Attach policies directly and search for AmazonS3FullAccess.
- Click Next, then Create user.
- Select the newly created user and open the Security credentials tab. In the Access keys section, click Create access key. Choose Application running outside AWS as the use case. Continue through the steps until the access key and secret key are generated.
- Copy the Access key ID and Secret access key, then save them in the config.php file under the IEE_AWS_S3 constant. The value should be an array like this: ["access-key" => "your-key", "secret-key" => "your-secret-key", "bucket-name" => "your-bucket-name", "region" => "your-aws-region"]. Replace your-bucket-name with the name of your S3 bucket and your-aws-region with the AWS region where your bucket is located (e.g., eu-west-2).
- Influeencer can now read emails sent to your domain.
- As all emails address @your-domain.com are stored in the S3 bucket, you may want to forward emails sent to a specific address to an external inbox. To do this, simply add the following array key to the IEE_AWS_S3 constant: ["forward" => ["your-email@email.com", ["address@your-domain.com"]]. Replace your-email@email.com with the email address you want to forward emails to, and address@your-domain.com with the email address you want to forward emails from.
Via IMAP or POP3
If you prefer to use a traditional email server, you can set up email piping using IMAP or POP3. This method is less reliable and may not work with all email providers.
- In the config.php file, set the IEE_EMAIL_SERVER constant to an array with the following values: ['host' => 'you-host-name', 'user' => 'you-host-user', 'password' => 'you-host-password', 'port' => you-port]. Replace you-host-name, you-host-user, you-host-password, and you-port with the actual values for your email server.
Third-party Services Setup
Influeencers needs various third-party services to work properly. You have to set all of them up in the config.php file. The following services are required. Some of them may incur costs depending on your usage.
YouTube
The YouTube API is used to search for YouTube influencers, retrieve channel details, and more.
- Go to the Google Cloud Console and create a new project.
- Enable the YouTube Data API v3 for your project.
- Go to Credentials and click Create credentials, then select API key. Create an API key and copy it. Add the it to the IEE_YOUTUBE_API_KEY constant in the config.php file.
- Create a new project and repeate the steps above to get a new API key. Add the it to the IEE_YOUTUBE_API_KEY_SEARCH constant in the config.php file.
Google Search
Google Search is used to find influencers contact details.
- Register at https://programmablesearchengine.google.com/.
- Create a search and leave the Sites to search field empty.
- Go to Edit search engine > Setup > Basic and copy the Search engine ID value.
- Visit https://developers.google.com/custom-search/v1/overview and click Get a key.
- Add the Search engine ID and the API KEY to the IEE_GOOGLE_SEARCH_KEY constant in the config.php file. The value should be an array like this: ['your-api-key', 'your-search-engine-id'].
Google Maps
Google Maps is used to get the country of influencers when coordinates are provided.
- Go to the Google Cloud Console and create a new project or open an existing project.
- Enable the Maps JavaScript API for your project.
- Create an API key and copy it. Add the it to the IEE_GOOGLE_MAPS_KEY constant in the config.php file.
OpenAI
OpenAI is used to analyze influencer descriptions, interpret search terms, find email contacts, detect and translate influencer languages, and more.
- Go to the OpenAI platform and create an account.
- Create a new API key and copy it. Add the it to the OPEN_AI_KEY constant in the config.php file.
- You need to have billing enabled on your OpenAI account to use the API.
Browserless
Browserless is used to scrape influencer channels and retrieve their details.
- Go to the Browserless website and create an account.
- Create a new API key and copy it. Add the it to the IEE_BROWSERLESS_API_KEY constant in the config.php file. The value should be an array like this: ['your-key']. You can add multiple keys if you have more than one Browserless account. The will be rotated automatically when needed.
Proxy
To get the best results with Influeencer, a proxy service is required. Since social platforms and search engines actively block scraping tools like Influeencer, proxies are necessary to bypass these restrictions and ensure smooth influencer searches. We recommend using at least 100 residential proxies for optimal performance. Proxy rotation is handled automatically based on the server port, each port corresponds to a different proxy. You may use any proxy provider you prefer, but we recommend decodo.com (see setup help below).
- Add the proxy service details to the IEE_PROXY constant in the config.php file. The value should be an array like this: ["address" => "your-proxy-host", "user" => "your-proxy-user", "password" => "your-proxy-password", "port" => your-start-proxy-port, "port-max" => your-end-proxy-port]. Replace your-proxy-host, your-start-proxy-port, your-end-proxy-port, your-proxy-user, and your-proxy-password with the actual values for your proxy server. Set port-max to false if the port is always the same.
-
If you choose to use decodo.com as your proxy provider, follow these steps:
- Sign up at decodo.com and create an account.
- Go to Dashboard > Residential Proxies > Proxy setup and under Setup you will find the proxy server details to enter in the IEE_PROXY constant. We recommend chosing a proxy location as closest as possible as your server location. We recommend using the rotating session option.
- Go to Dashboard > Residential Proxies > Pricing and choose Pay As You Go. It is the most convenient plan for Influeencer.
SaaS Setup
The SaaS version of Influeencer requires additional setup to manage subscriptions, payments, branding, and more. The SaaS version requires the purchase of the Envato Extended License. Edit config.php and fill the required constants below.
-
IEE_SAAS
Set to true to enable the SaaS features. -
IEE_ADMIN_PASSWORD
The password for the admin area. It must be an hash. To generate a hash for your password, visit https://influeencer.com/docs/files/password.php?p=12345678. Replace 12345678 with your password. -
IEE_DOCS_URL
The URL of the documentation site, e.g., https://influeencer.com/docs/. You can use our website as a starting point for your own docs. -
IEE_ICON_URL
The URL of your website icon, e.g., https://yourdomain.com/media/icon.svg. -
IEE_LOGO_URL
The URL of your website logo, e.g., https://yourdomain.com/media/logo.png. -
IEE_BRAND_NAME
The name of your brand, e.g., Influeencer. -
IEE_DISCLAIMER
The disclaimer text to show in the login and registration page, e.g., By creating an account or using our service, you agree to our <a target="_blank" href="https://influeencer.com/terms-of-service" class="iee-link">Terms of Service</a> and <a target="_blank" href="https://influeencer.com/privacy" class="iee-link">Privacy Policy</a>. © 2025-2026 influeencer.com. All rights reserved. -
IEE_INVOICE_TEXT
The text to show in the invoice, usually your company details, e.g., Schiocco Ltd\n71-75 Shelton Street\nCovent Garden\nLondon\nWC2H9JQ. Use \n to create a new line. -
IEE_CURRENCY
The currency to use for payments, e.g., USD, EUR, GBP. -
STRIPE_SECRET_KEY
Enter your Stripe secret key, which you can obtain from the Stripe Dashboard. This key is required to manage subscriptions and payments. Currently, only Stripe is supported, but we plan to add more payment gateways in the future. You can also hire us to integrate a payment gateway of your choice. -
IEE_PHP_PATH
The PHP installation path on your server, e.g., /usr/bin/php or /opt/plesk/php/8.3/bin/php. If your installation is on a Windows server, you also need to set the IEE_WINDOWS constant to true.
Payment gateway
Currently, only Stripe is supported as a payment gateway. We plan to add more payment gateways in the future. You can also hire us to integrate a payment gateway of your choice. If Stripe is not available in your country, you can still use the service with your customers and manage subscriptions manually from the admin area.
Stripe
- Go to https://dashboard.stripe.com/register and create an account.
- Complete the account setup and verify your email address. Activate your account at https://dashboard.stripe.com/account/onboarding.
- Go to Developers > API keys and copy the Secret key. Add it to the STRIPE_SECRET_KEY constant in the config.php file.
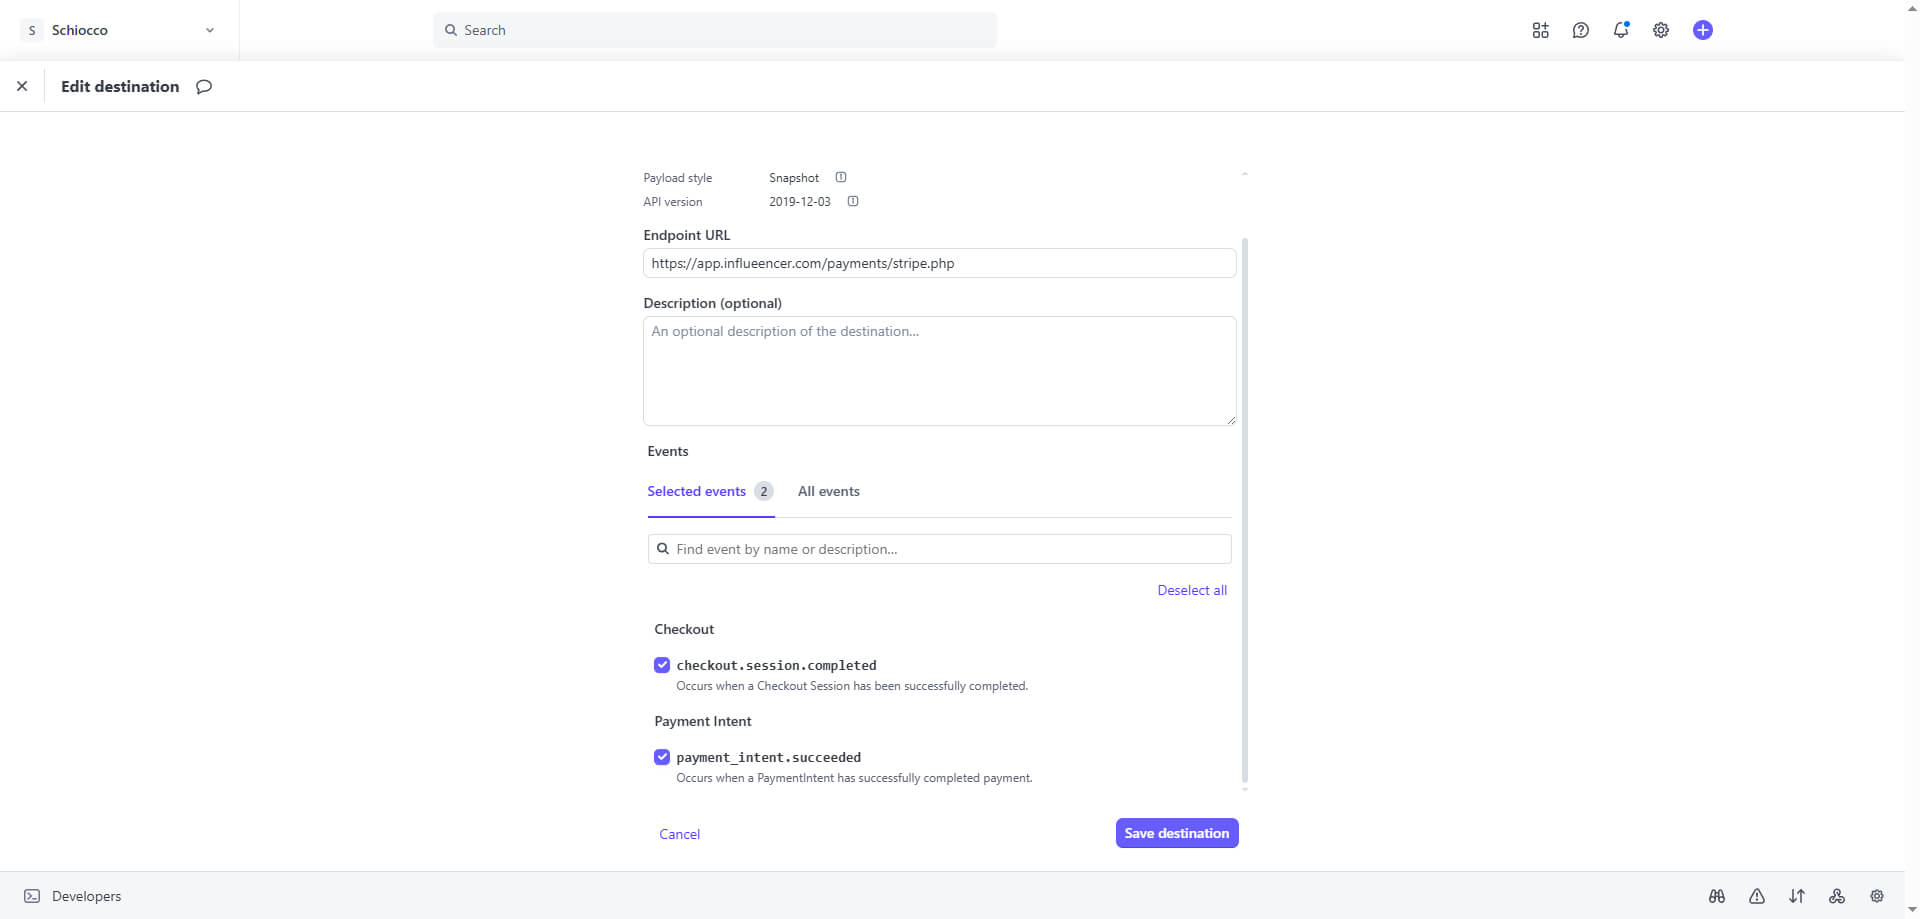
- Visit https://dashboard.stripe.com/webhooks/ and add an end point, in Endpoint URL enter https://your-domain.com/payments/stripe.php. Replace your-domain.com with your actual domain. Listen for the following events: checkout.session.completed, payment_intent.succeeded.
Website and docs
You are free to download and host our website and documentation on your own domain. All references to influeencer must be replaced with your own domain name and branding. The website is a static HTML site, which you can edit and customize as you wish. Both the website and documentation are provided as-is and without support. If you need assistance with customization or further development, you can hire us.
Download website and docsAdministration area
The administration area is available at https://your-domain.com/admin.php. Replace your-domain.com with your actual domain. From there, you can manage memberships, view registered users, update user details, and more.
Optional Configuration
The following configurations are optional but recommended for improved performance and a smoother user experience. They are especially helpful for the first few hundred results each day, after which quota limits will apply.
AWS S3 cache
Influencer caches YouTube channel details and search results. By default, these are stored in the cache folder within the installation directory. To save server space and reduce costs, you can configure AWS S3 to store the cache instead.
- Log in to AWS as the root user from aws.amazon.com.
- Go to Amazon S3 and click Create bucket.
- Enter a name, choose ACLs disabled and Block all public access. Leave the other options as default.
- Go to IAM > Users, select an existing user or click Create user, enter a name and click Next.
- Select Attach policies directly and search for AmazonS3FullAccess.
- If you are creating a new user, click Next, then Create user. Select the newly created user and open the Security credentials tab. In the Access keys section, click Create access key. Choose Application running outside AWS as the use case. Continue through the steps until the access key and secret key are generated.
-
Edit the config.php file.
- If you are editing an existing use and the IEE_AWS_S3 constant was already setup in the previous steps, just add the bucket-name-cache array key with the name of your new S3 bucket.
- If you are creating the IEE_AWS_S3 constant for the first time, copy the Access key ID and Secret access key, then create the IEE_AWS_S3 constant in the config.php file. The value should be an array like this: ["access-key" => "your-key", "secret-key" => "your-secret-key", "bucket-name-cache" => "your-bucket-name", "region" => "your-aws-region"] Replace your-bucket-name with the name of your S3 bucket and your-aws-region with the AWS region where your bucket is located (e.g., eu-west-2).
AWS S3 media
By default Influeencer saves influencer profile images and more media in the uploads folder within the installation directory. To save more space on your server and reduce costs, you can use AWS S3 to store the media files.
- Log in to AWS as the root user from aws.amazon.com.
- Go to Amazon S3 and click Create bucket.
- Enter a name, choose ACLs disabled and Block all public access. Leave the other options as default.
- Go to IAM > Users, select an existing user or click Create user, enter a name and click Next.
- Select Attach policies directly and search for AmazonS3FullAccess.
- If you are creating a new user, click Next, then Create user. Select the newly created user and open the Security credentials tab. In the Access keys section, click Create access key. Choose Application running outside AWS as the use case. Continue through the steps until the access key and secret key are generated.
-
Edit the config.php file.
- If you are editing an existing use and the IEE_AWS_S3 constant was already setup in the previous steps, just add the bucket-name-cache array key with the name of your new S3 bucket.
- If you are creating the IEE_AWS_S3 constant for the first time, copy the Access key ID and Secret access key, then create the IEE_AWS_S3 constant in the config.php file. The value should be an array like this: ["access-key" => "your-key", "secret-key" => "your-secret-key", "bucket-name-media" => "your-bucket-name", "region" => "your-aws-region"] Replace your-bucket-name with the name of your S3 bucket and your-aws-region with the AWS region where your bucket is located (e.g., eu-west-2).
OpenAI search
This feature uses OpenAI to search for influencer email addresses on the web. While it may increase the number of emails found, it also increases the likelihood of incorrect emails. We do not recommend activating this feature, as it often returns many inaccurate results and consumes a significant amount of OpenAI credits.
- Edit the config.php file and add the OPEN_AI_SEARCH constant, setting its value to true.
YouTube cookies
This feature uses YouTube cookies of an YouTube account to improve the scraping of YouTube channel details from youtube.com. Unfortunately, YouTube monitors account activity and may block accounts that are used for scraping sooner or later. Therefore, we recommend using this feature with multiple accounts that are not used for any other purpose.
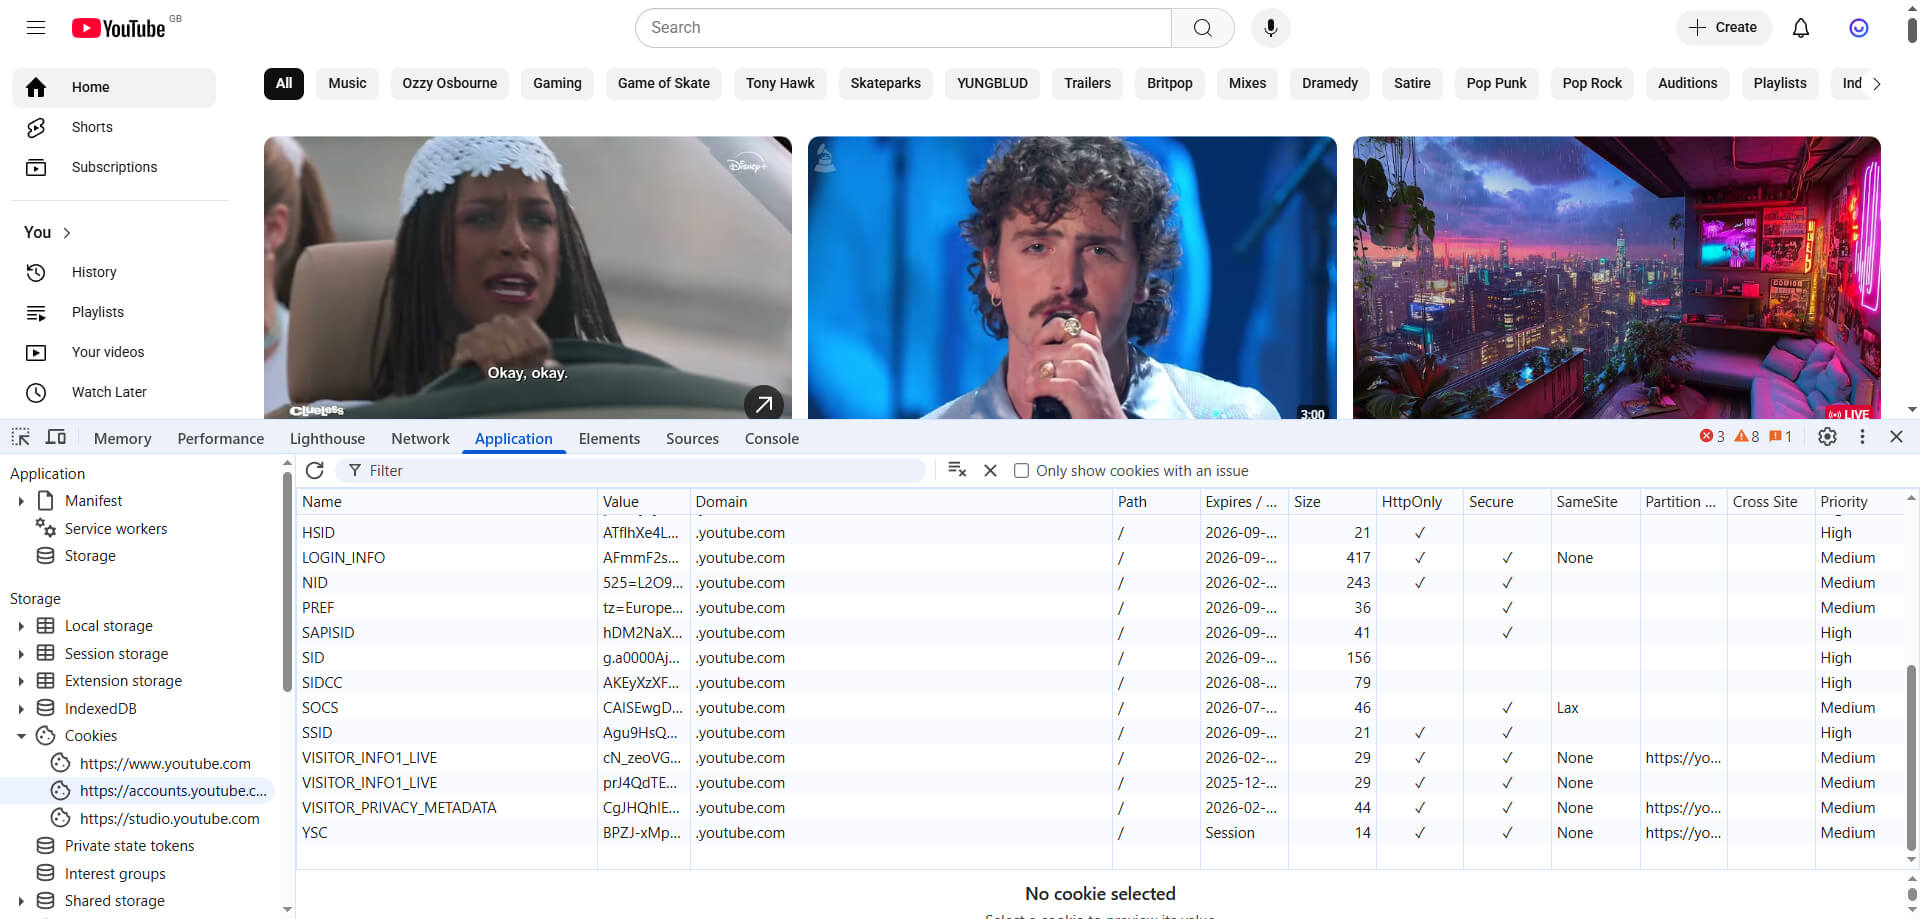
- Visit youtube.com. Use a browser like Chrome or Firefox. You do not need to be logged in.
- Open the browser developer tools (F12 or right-click > Inspect).
- Go to the Application tab and select Cookies from the left sidebar. Click on https://www.accounts.youtube.com.
- Copy the values of the SAPISID, HSID, SSID, SID, APISID, and SOCS cookies.
- Edit the config.php file and add the IEE_INSTAGRAM_COOKIES constant. The value should be an array or arrays like this: [["SAPISID" , "HSID", "SSID", "SID" , "APISID", "SOCS"]]. Replace SAPISID, HSID, SSID, SID, APISID, and SOCS with the actual cookie values. You can add multiple arrays if you have more than one YouTube account. They will be rotated automatically when needed.
Instagram cookies
This feature uses Instagram cookies of an Instagram account to improve the scraping of Instagram profile details from instagram.com. Unfortunately, Instagram aggressively and actively monitors account activity and will block accounts that are used for scraping very quickly, often within a few hours. Therefore, we do not recommend using this feature unless you have a lot of dedicated Instagram accounts that are not used for any other purpose.
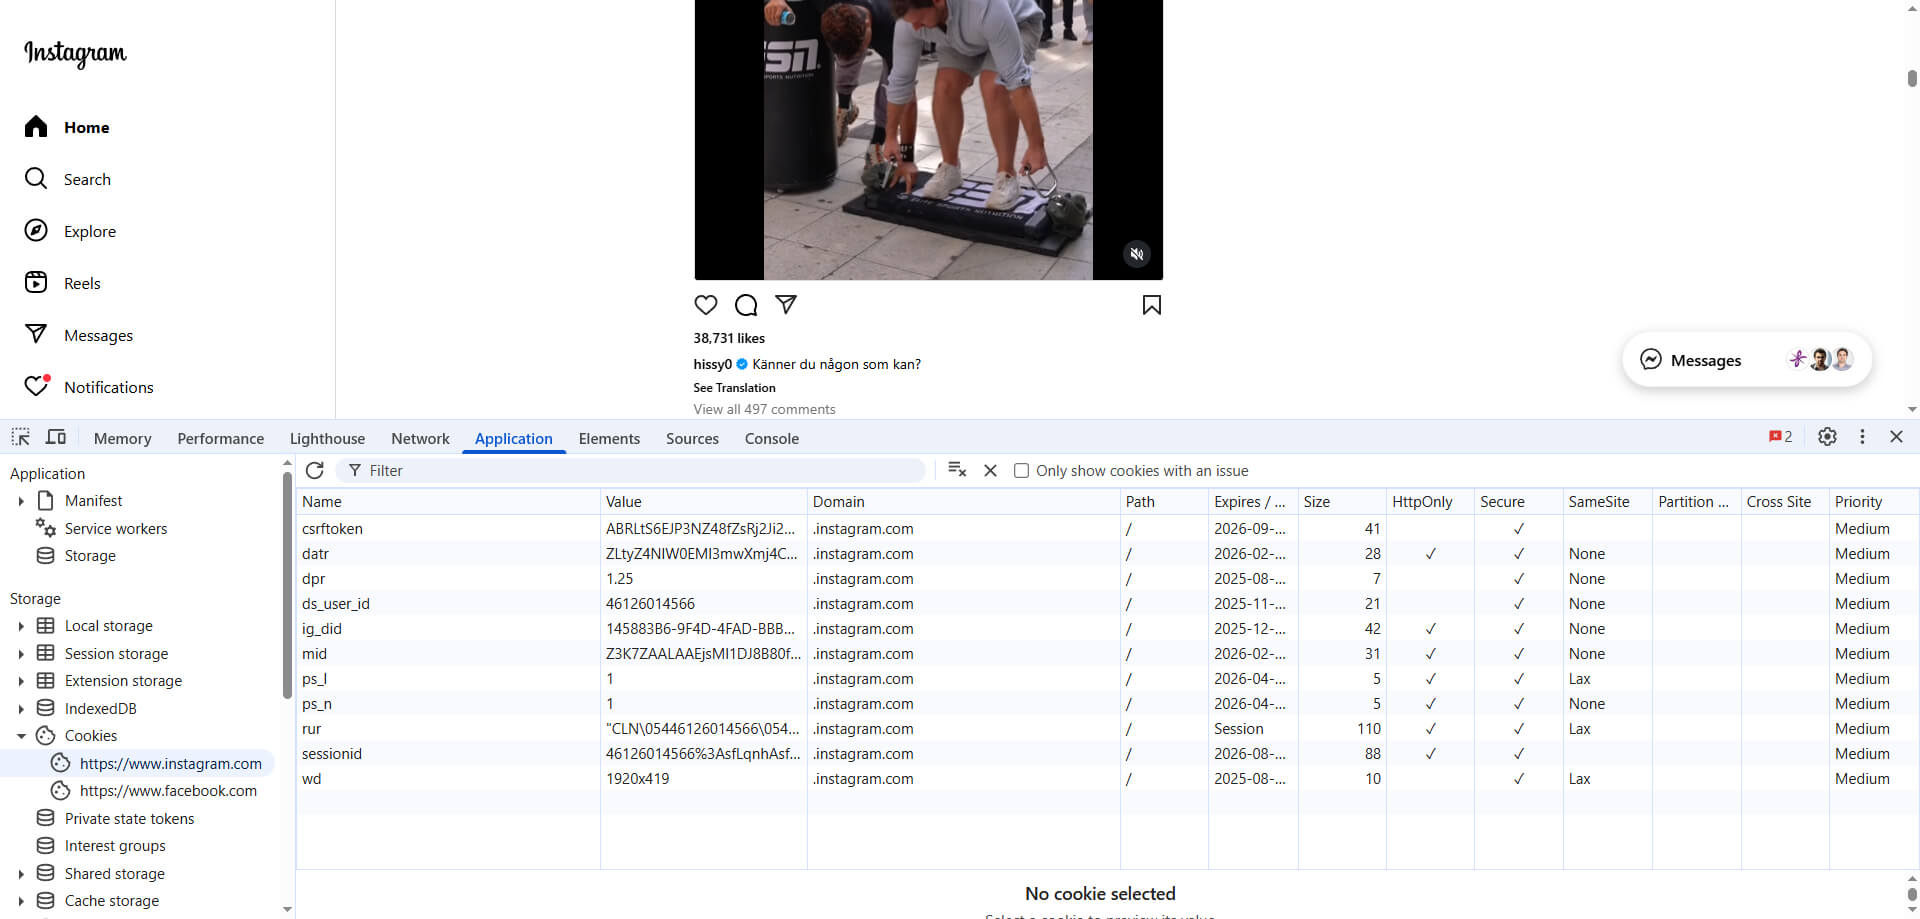
- Login to instagram.com with the account you want to use for scraping. Use a browser like Chrome or Firefox.
- Open the browser developer tools (F12 or right-click > Inspect).
- Go to the Application tab and select Cookies from the left sidebar. Click on https://www.instagram.com.
- Copy the values of the sessionid, csrftoken, and ds_user_id cookies.
-
Edit the config.php file and add the IEE_INSTAGRAM_COOKIES constant.
The value should be an array or arrays like this: [["sessionid" , "csrftoken", "ds_user_id"]].
Replace sessionid, csrftoken, and ds_user_id with the actual cookie values.
You can add multiple arrays if you have more than one Instagram account.
They will be rotated automatically when needed.
Facebook app
The Facebook API is used to search for Facebook pages and retrieve page details.
- Register a new account at developers.facebook.com or login with your existing account.
- Create a new app, as app type select Other, then select Business. Enter a name, do not select any Business portfolio.
- From the app dashboard, go to Settings > Basic and enter a Privacy Policy URL and a Terms of Service URL. Upload an app icon and select a category, then click Save changes.
- Complete the Business verification. You may need to provide a business email, phone number, and address.
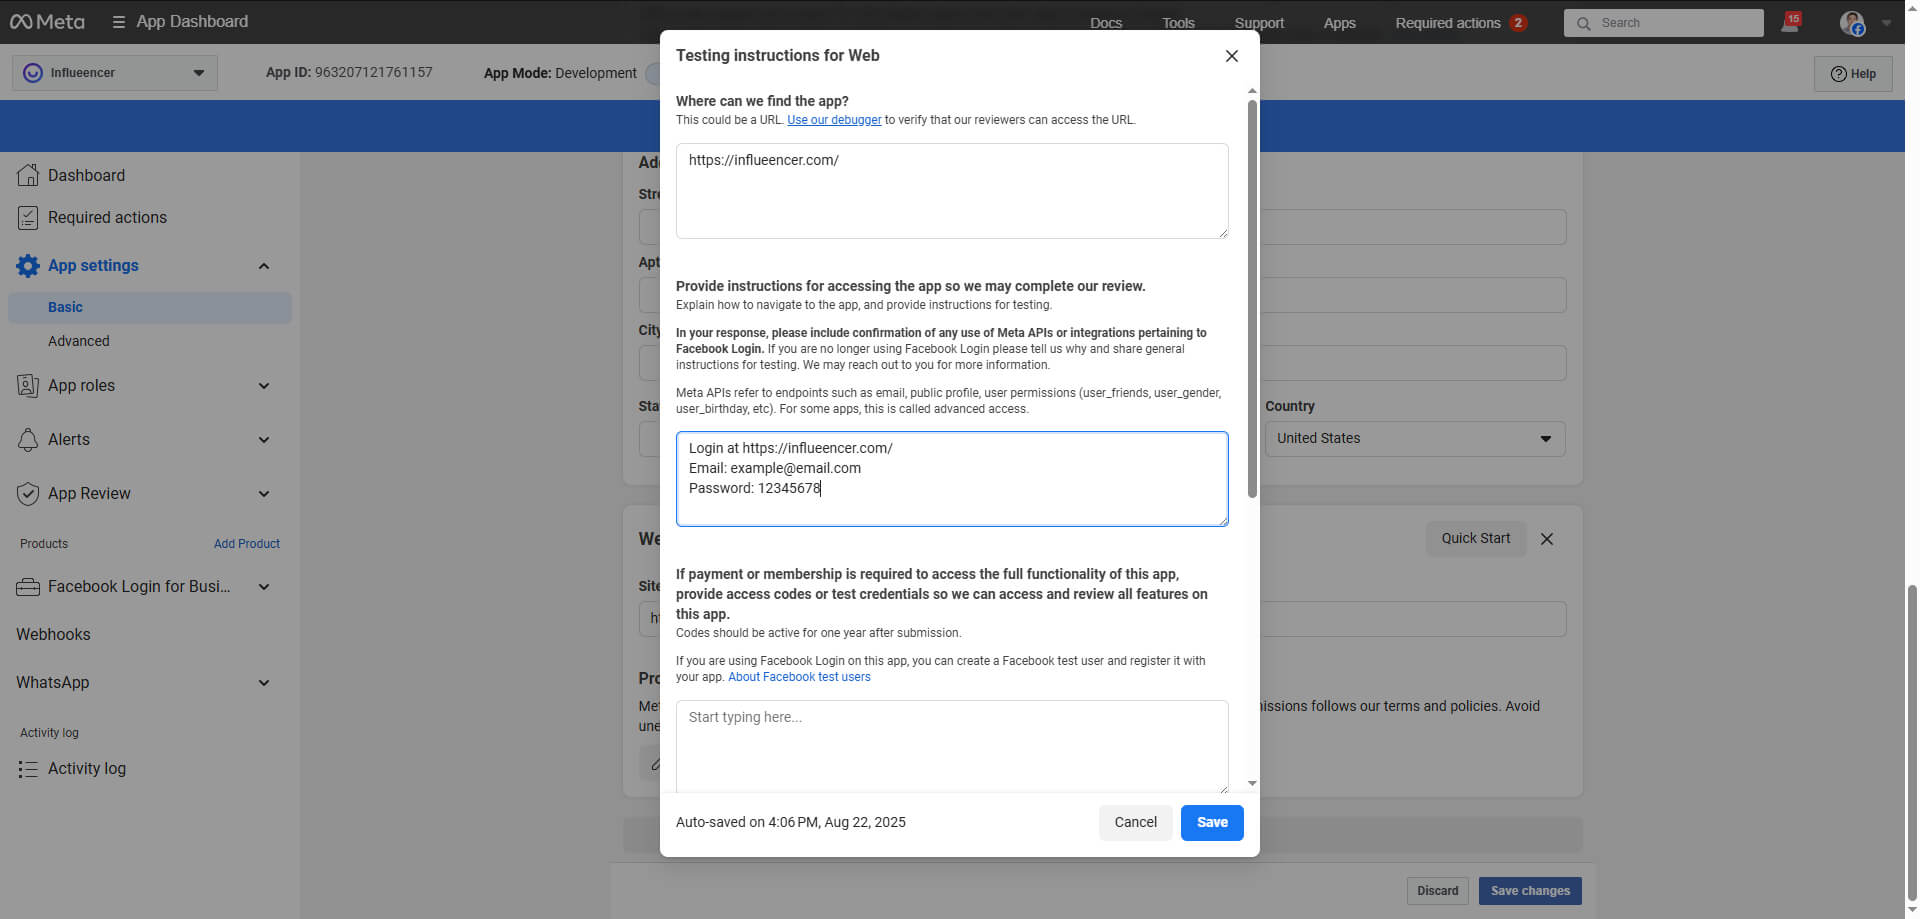
- Under Platforms click Add platform and select Website.
- Enter your website URL and provide instructions for accessing the your Influeencer app (email and password), then Save changes.
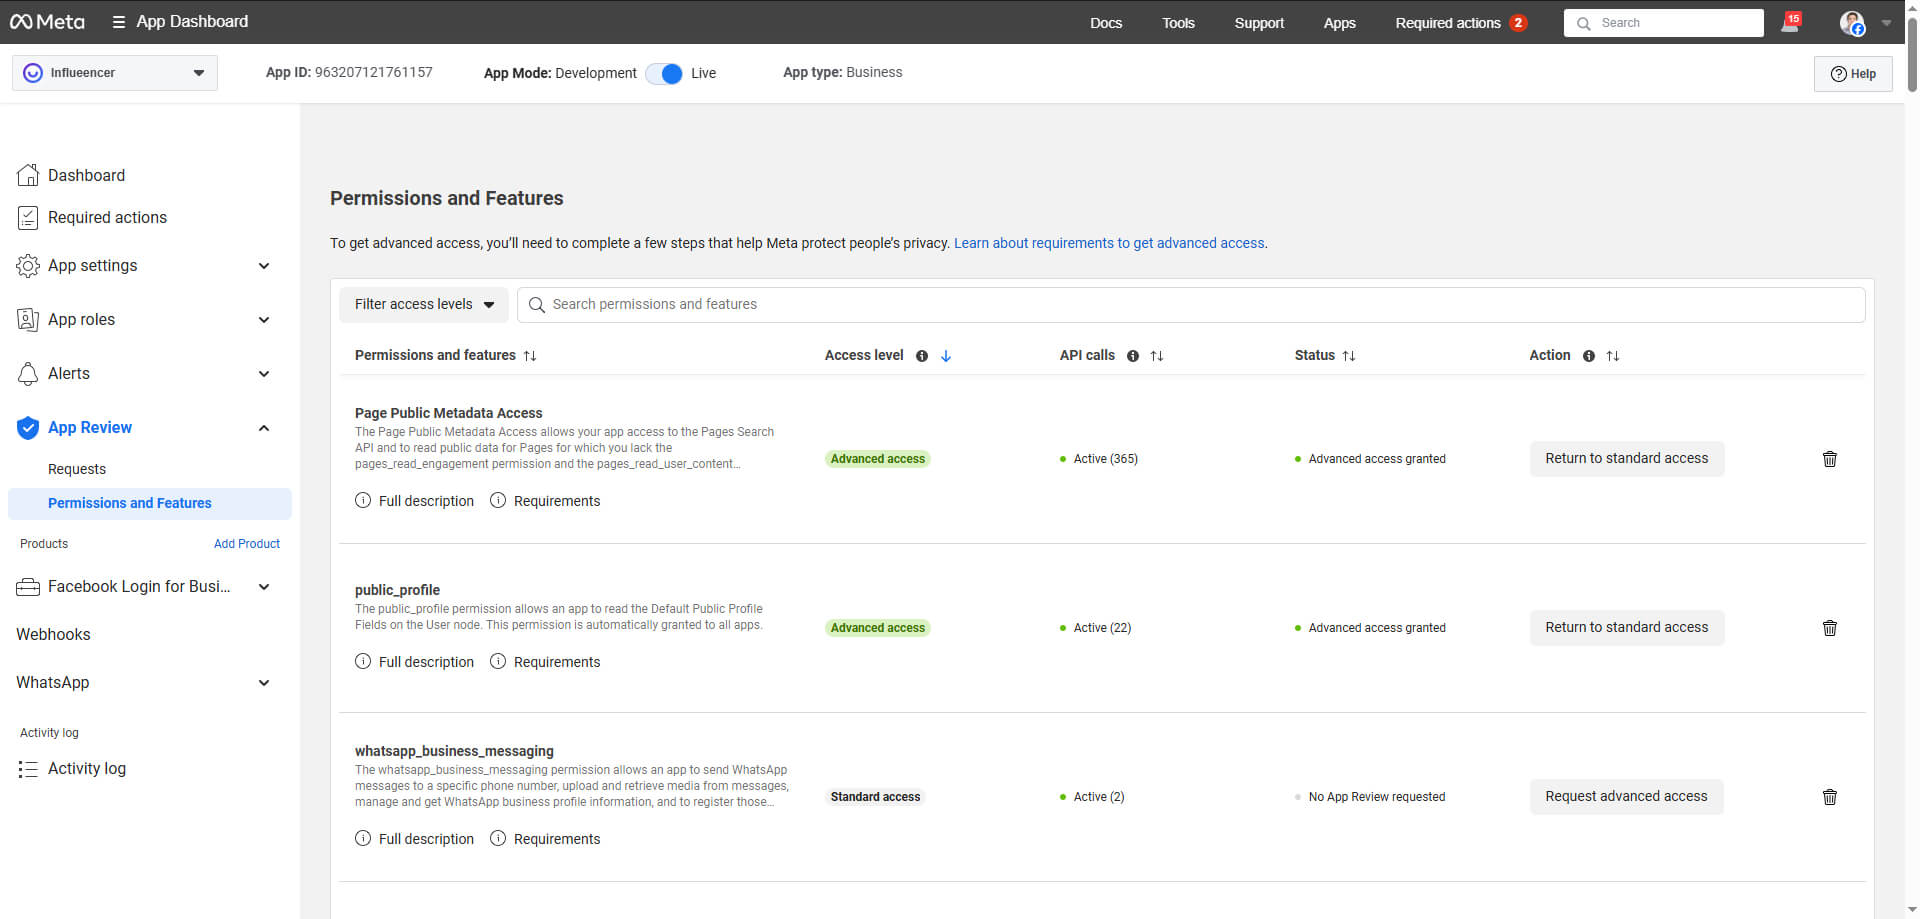
- From the left sidebar, go to App Review > Permissions and Features.
- Get advanced access for public_profile and request advanced access for Page Public Metadata Access.
- Go to App Review > Requests and submit the app for review. You will need to provide a description of how you will use the data for Page Public Metadata Access, enter: This scope is required to analyze engagement with public Pages by viewing Like, follower counts, page name, page description, page picture You will also need to provide a video showing how you loggin to your app and use the Facebook search feature. Use this video as a reference to record yours.
Miscellaneous
- Total costs (Proxy, Browserless, Google Search API...) depend on the user usage. It's typically between $1 and $3 per 50 results. Searches with filters or search terms related to small niches with fewer influencers may result in higher costs.
Installation Service
If you want us to install Influeencer for you can hire us for a one-time fee of 150 USD. In order to use this service, Plesk is required, you need to provide us with: SSH access, or Plesk access, or AWS access. If you do not have Plesk, we will install it for you. If you do not have a server, we will setup an AWS server for you. The service includes:
Contact us throught the chat here on the right bottom corner of the page or email us at sales@influeencer.com. We usually reply within 24 hours.
Custom Work
If you want us to customize Influeencer for you, please contact us and send us your requirements. We will provide you with a quote based on the complexity of the work. Our hourly rate is 100 USD.
Contact us throught the chat here on the right bottom corner of the page or email us at sales@influeencer.com. We usually reply within 24 hours.